# Convoflow.ai — Full Documentation Corpus for LLMs
> Modular conversational infrastructure and AI automation platform.
This file contains the complete, unified technical specification of the entire Convoflow platform (Get Started, Flow Nodes, and Connections) for direct consumption by language models and autonomous agents.
## Per-document routes
Each documentation page has its own `llms.txt`:
- **Google Sheets Node**: [/en/nodes/google-sheets/llms.txt](/en/nodes/google-sheets/llms.txt)
- **Google Docs Node**: [/en/nodes/google-docs/llms.txt](/en/nodes/google-docs/llms.txt)
- **Google Calendar Node**: [/en/nodes/google-calendar/llms.txt](/en/nodes/google-calendar/llms.txt)
- **Email Node**: [/en/nodes/email/llms.txt](/en/nodes/email/llms.txt)
- **WhatsApp Node**: [/en/nodes/whatsapp/llms.txt](/en/nodes/whatsapp/llms.txt)
- **Agent Node**: [/en/nodes/agent/llms.txt](/en/nodes/agent/llms.txt)
- **Google Service Account**: [/en/connections/google-service-account/llms.txt](/en/connections/google-service-account/llms.txt)
- **Email SMTP Connection**: [/en/connections/email-smtp/llms.txt](/en/connections/email-smtp/llms.txt)
- *(Every node and connection has its own `/en/.../llms.txt`)*
---
# SECTION 1: GET STARTED
## Artificial intelligence providers
> URL: /en/get-started/ai-providers
> Specific llms.txt: /en/get-started/ai-providers/llms.txt
# Artificial intelligence providers
Convoflow integrates with leading AI model providers. This enables the **Agent** node and reasoning blocks to understand natural language, follow complex business guidelines, and execute visual tool subflows autonomously.
---
## Available models in the Agent node
When configuring the **Agent** node on your flow canvas, you can choose the provider and model to process conversation turns. The following models are supported:
| Provider | Available models | Focus and recommended use cases |
| :--- | :--- | :--- |
| **OpenRouter** | • Claude Sonnet 4
• Claude Haiku 4.5
• DeepSeek Chat
• GLM 5.2
• GLM 5.3 Flash
• GLM 5.3 | High multimodel versatility, deep reasoning with Claude, great tool orchestration, and fast, cost-effective options with GLM and DeepSeek. |
| **OpenAI** | • GPT 5.4
• GPT 5.4 Mini
• GPT 5.4 Nano
• GPT 5.6 Luna
• GPT 5.6 Terra
• GPT 5.6 Sol | Industry-leading instruction following, autonomous agent workflows, and cost-effective speed options (Mini and Nano) or multimodal reasoning (GPT 5.6 Luna, Terra, and Sol). |
| **DeepSeek** | • DeepSeek V4 Flash
• DeepSeek V4 Pro | Strong technical reasoning and broad contextual understanding with rapid turnaround (Flash) or deep analysis (Pro). |
| **Groq** | • GPT OSS 120B
• GPT OSS 20B | Ultra-low latency inference on specialized hardware (LPU), ideal for real-time conversations where instantaneous responsiveness is required. |
---
## Selecting a model in your flow
1. On the visual canvas, open the property panel for the **Agent** node.
2. In the **Provider** (`modelProvider`) field, choose your desired platform (`openrouter`, `openai`, `deepseek`, or `groq`).
3. In the **Model** (`modelId`) field, select the model fitting your task complexity and speed requirements.
4. Wire any required tools using subflows so the agent can look up data or trigger external actions before answering.
---
## How the Engine Works
> URL: /en/get-started/architecture
> Specific llms.txt: /en/get-started/architecture/llms.txt
# How the Convoflow Engine Works
Convoflow acts like an intelligent coordinator that receives customer messages, understands what they need, and immediately executes the right actions in the background.
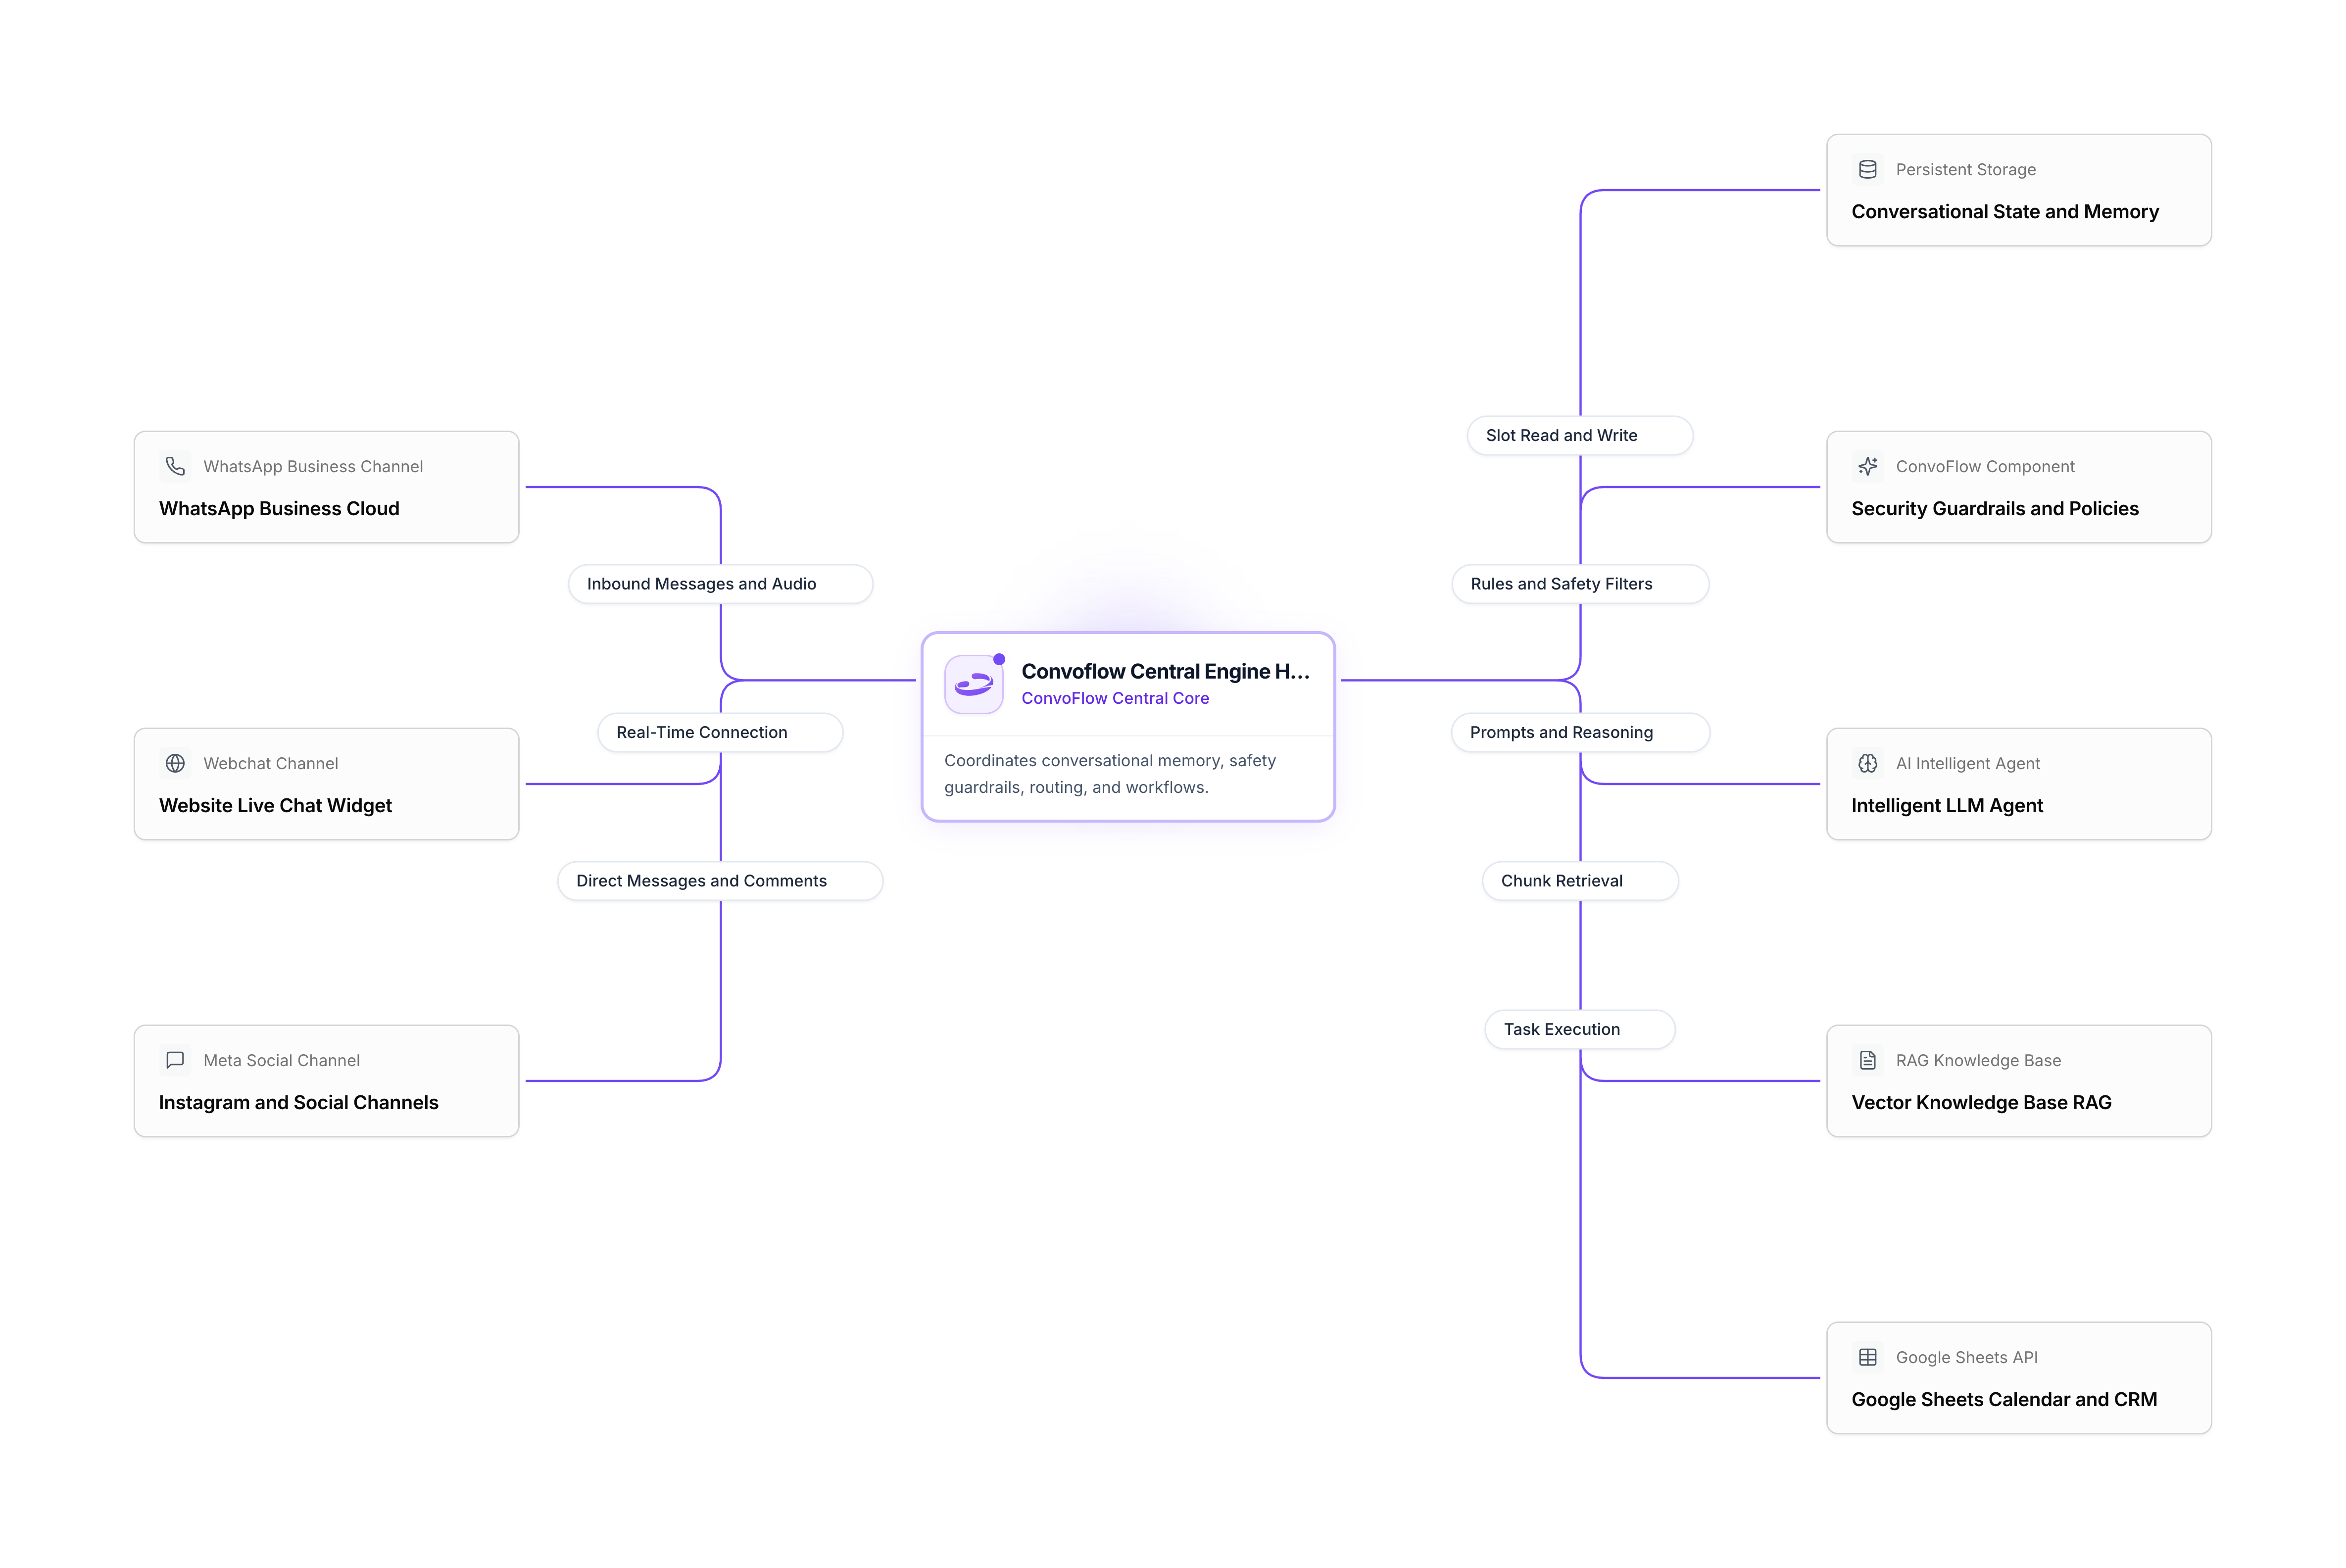
Mermaid
```text
graph TD
subgraph Inbound Messages
E1[Customer WhatsApp]
E2[Website Chat]
E3[Other Channels]
end
subgraph Convoflow Core
R[Flow Orchestrator]
SM[Conversation Memory]
EX[Action Runner]
end
subgraph Actions and Lookups
LLM[Artificial Intelligence]
VEC[Your Documents and FAQs]
APP[Google Sheets, Calendar and Emails]
end
E1 & E2 & E3 --> R
R <--> SM
R --> EX
EX <--> LLM & VEC & APP
```
---
## Core Principles in Plain Language
### 1. Conversation Memory (Variables)
Whenever a user chats with your assistant, Convoflow remembers the details they share (such as their name, phone number, or meeting time). You can reuse any saved variable in later steps by typing `{variable_name}`.
### 2. Fast and Seamless Responses
The engine is built to respond within milliseconds. When your assistant checks a calendar or writes a row to a spreadsheet, it happens smoothly without freezing the chat.
### 3. Normal Paths and Backup Routes
Every action has two paths:
- **Normal path:** Continues the flow when everything succeeds.
- **Backup route:** Activates if an external service is temporarily unreachable, allowing you to notify the user gracefully or transfer the conversation to a human agent.
---
## AI Flow Designer
> URL: /en/get-started/designer
> Specific llms.txt: /en/get-started/designer/llms.txt
import { Card, CardGrid } from '@site/src/components';
# The Designer: AI Flow Creation
The **Designer** allows you to define your own AI flows with just a few initial instructions. Instead of dragging and connecting every single block manually from a blank canvas, you can describe in plain language what assistant you want to build, and the Designer will create, structure, and connect the nodes directly on the visual canvas.
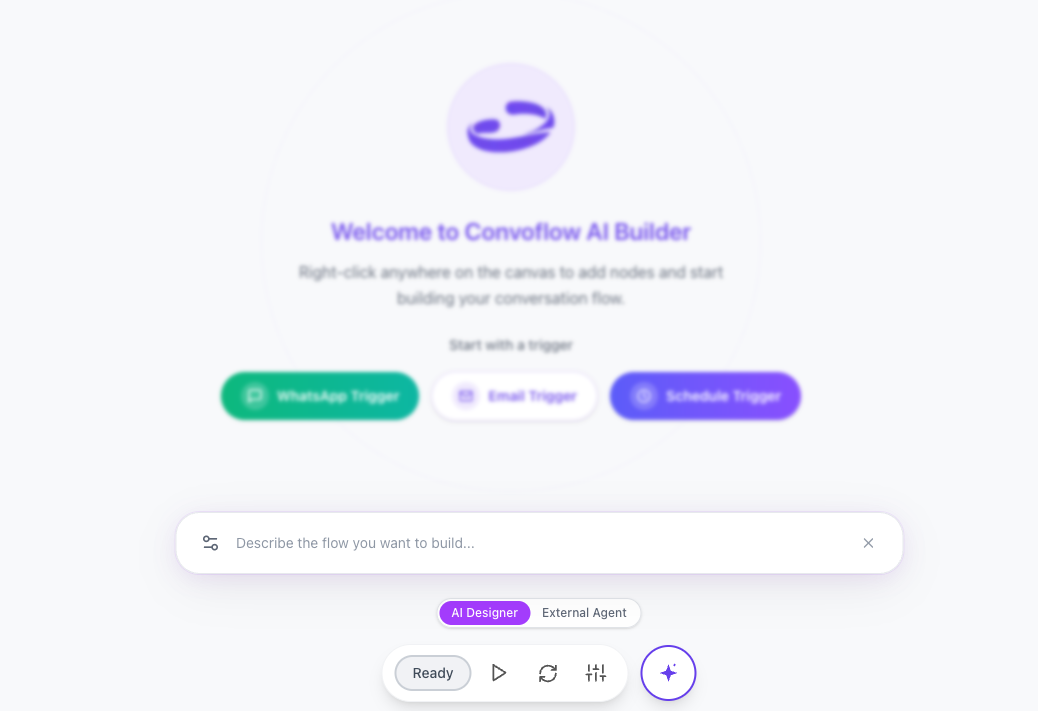
Mermaid
```text
graph LR
U[Natural Language Instruction] --> D[AI Designer]
D -->|Step Plan| P[Flow Generation]
P -->|Nodes and Connections| C[Convoflow Visual Canvas]
C -->|Refinement & Adjustments| U
```
---
## How the Designer works for the user
Interacting with the Designer is as simple as chatting with an automation specialist:
### 1. Initial natural language instructions
Describe the overall goal of your assistant, the data it needs to collect, and the tools it connects to. For example:
> *"Create a flow to capture leads via WhatsApp. Ask for their name, email, and company, check availability in Google Calendar to schedule a demo, and save the data in Google Sheets."*
### 2. Automatic plan and visual building
When receiving your prompt, the Designer:
- Defines a clear, readable action plan.
- Inserts the required nodes onto the canvas (messages, questions, Google integrations, or payments).
- Wires success paths and error recovery routes.
- Configures initial parameters and descriptive variable names.
### 3. Continuous iteration and refinement
You can keep chatting with the Designer to update your flow at any time:
- *"Make the greeting tone more friendly and formal."*
- *"Add a condition so that customers in Mexico see prices in MXN and all others see USD."*
- *"Send an alert to our `#sales` Slack channel whenever an appointment is confirmed."*
### 4. Full visual control
The Designer does not replace the canvas—it empowers it. Everything created by the Designer remains fully visible and editable. You can drag nodes, tweak text, and edit properties manually whenever you prefer.
---
## Best practices for prompt instructions
For best results on your first try, we recommend including:
1. **Input channel:** Specify if your assistant communicates over WhatsApp, web chat, or email.
2. **Data to collect:** Clarify the exact details you need from the user (name, phone, interest, etc.).
3. **Tools to integrate:** Mention any third-party services involved (Google Sheets, Calendar, Stripe, HubSpot, etc.).
4. **Business rules:** Mention key requirements early (business hours, attempt limits, human handoff conditions).
---
## Get Started
> URL: /en/
> Specific llms.txt: /en//llms.txt
import { Card, CardGrid } from '@site/src/components';
# Welcome to Convoflow
Convoflow is a visual platform that allows you to build intelligent assistants and conversational workflows quickly and easily. With Convoflow, you can engage with your customers across channels like WhatsApp, Webchat, and Email, while seamlessly connecting your everyday tools like Google Sheets, Calendar, and Docs without technical headaches.
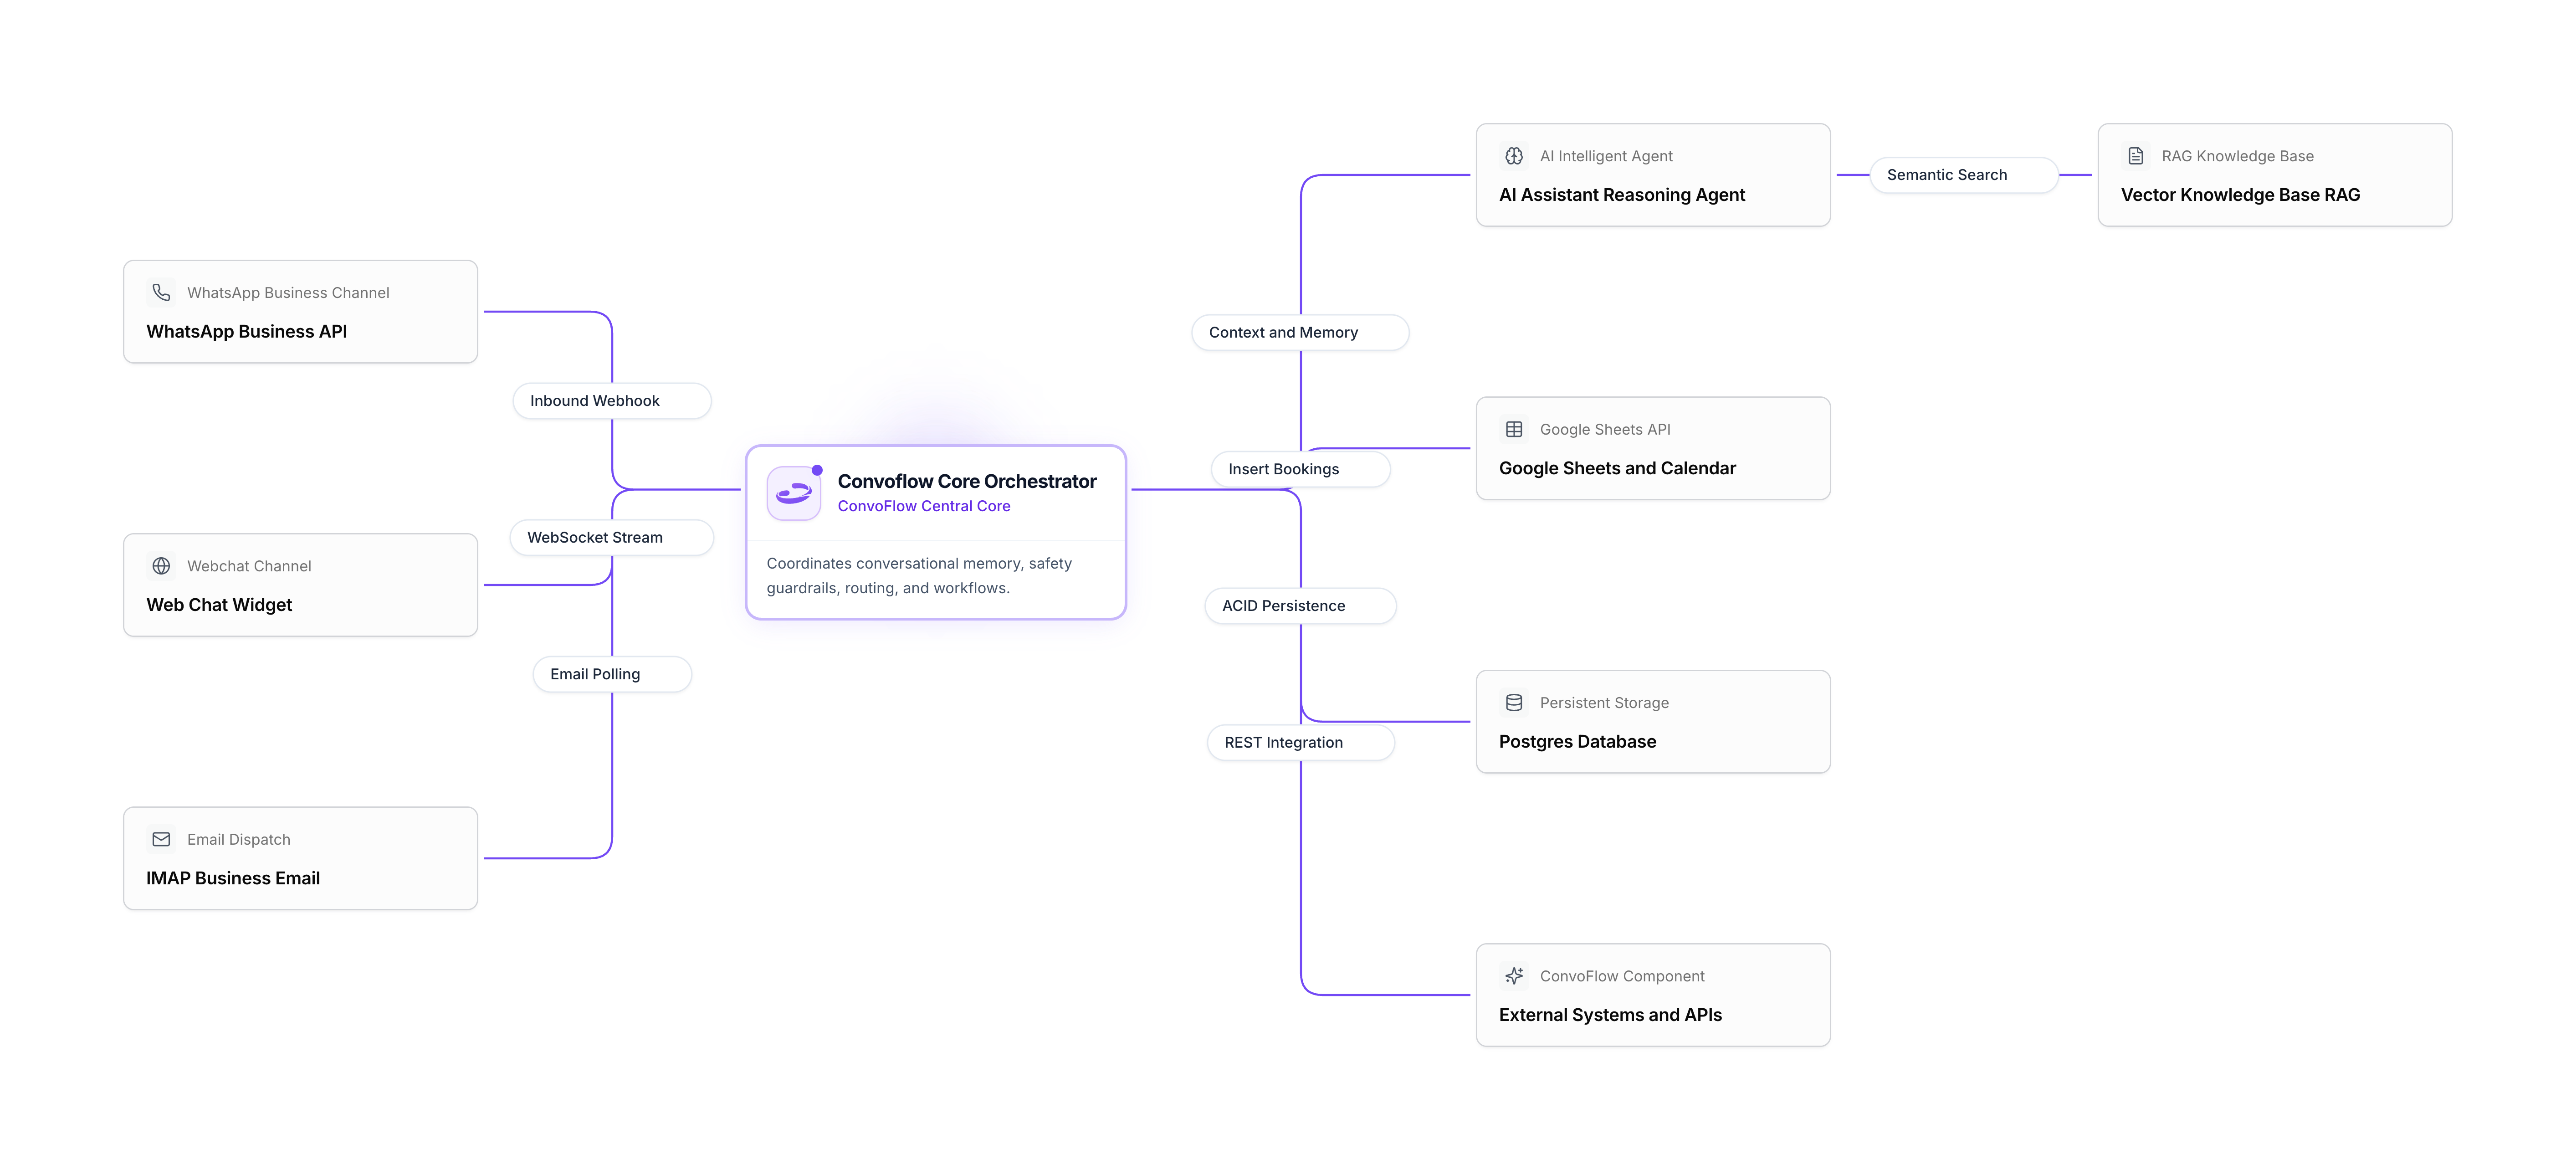
Mermaid
```text
graph LR
subgraph Channels
W[WhatsApp]
WB[Webchat]
E[Email]
end
subgraph Convoflow
F[Step-by-Step Flow]
A[AI Assistant]
K[Documents and FAQs]
end
subgraph Your Tools
G[Google Sheets and Calendar]
S[Databases]
H[Systems and APIs]
end
W & WB & E --> F
F <--> A
A <--> K
F --> G & S & H
```
---
## Documentation Sections
The documentation is organized into three main areas to guide you step by step:
Learn core concepts and create your first automated customer workflow in just 5 minutes.
Explore the visual blocks you can drag into your flow: Google, WhatsApp, Email, and AI.
Securely connect your Google accounts, WhatsApp numbers, email servers, and AI providers.
---
## Popular Google Integrations
Convoflow connects directly with your Google Workspace tools to automate daily tasks:
Save new leads, look up inventory, and update spreadsheet rows in real time.
Generate personalized contracts and proposals by automatically filling in document templates.
Check availability and schedule appointments automatically with Google Meet links included.
---
## How does a flow work in Convoflow?
Creating an automation in Convoflow is like assembling a visual diagram:
1. **Entry trigger:** A user sends a WhatsApp message or visits your web chat.
2. **Questions and answers:** The flow requests the necessary data (such as name, phone, or service of interest).
3. **Automatic actions:** The assistant saves the information in Google Sheets, checks free dates in Calendar, or consults internal documents.
4. **Personalized reply:** The user receives a clear, immediate answer on their preferred channel.
---
## Resources for Language Models (LLMs)
If you are using AI coding assistants or LLMs, you can access the standard text specification:
- [**llms.txt (Full Documentation)**](pathname:///en/llms.txt) — Unified plain-text specification of the entire Convoflow platform.
---
## Quickstart Guide
> URL: /en/get-started/quickstart
> Specific llms.txt: /en/get-started/quickstart/llms.txt
import { Card, CardGrid } from '@site/src/components';
# Quickstart Guide: Your First Flow in 5 Minutes
In this guide, we will build a customer flow that captures user details, saves them in Google Sheets, schedules an appointment in Google Calendar, and sends an email confirmation.
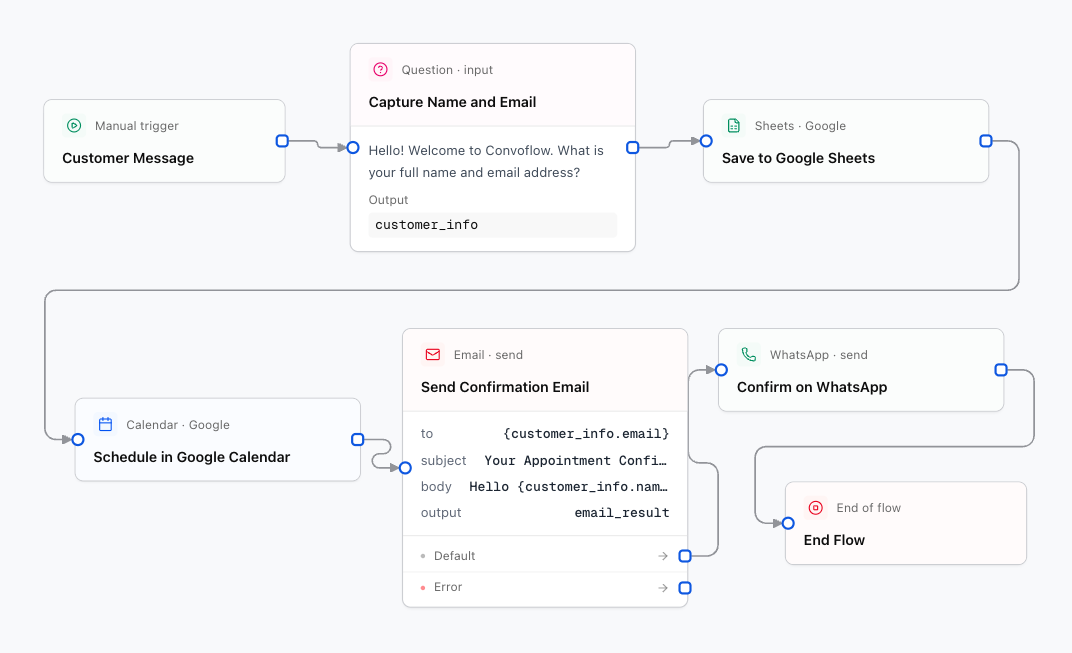
Mermaid
```text
graph LR
S[Customer Message] --> Q1[Capture Name and Email]
Q1 --> GS[Save to Google Sheets]
GS --> GC[Schedule in Google Calendar]
GC --> EM[Send Confirmation Email]
EM --> E[Confirm on WhatsApp]
```
---
## Step 1: Connect your Google Account
Before using Google nodes in your flow:
1. Go to **Connections** in the left sidebar of Convoflow.
2. Click **New Connection** and choose **Google Service Account**.
3. Paste your Google credentials JSON file (or follow our [Google connection guide](/en/connections/google-service-account)).
4. Click **Test Connection** and save.
---
## Step 2: Build the Flow on the Visual Canvas
1. In the main menu, click **Flows > New Flow**.
2. **Open the node catalog:** Right-click anywhere on an open area of the visual canvas (or use the equivalent gesture on your trackpad, such as a two-finger click or tap) to open the node catalog and select any block.
3. Add a **Question** block and set:
- **Question:** `Hi! What is your name and email address?`
- **Save variable:** `user_info`
4. Connect this block to a **Google Sheets** node:
- **Action:** `insertRows`
- **Spreadsheet ID:** Your spreadsheet ID
- **Rows data:**
```json
[
{
"Date": "{current_date}",
"Name": "{user_info.name}",
"Email": "{user_info.email}"
}
]
```
5. Connect to a **Google Calendar** node:
- **Action:** `createEvent`
- **Event Title:** `Consultation with {user_info.name}`
- **Include Google Meet:** Enabled (`true`)
6. Connect to an **Email** node to send the meeting confirmation with the Google Meet link.
---
## Step 3: Test and Publish
1. Click **Simulate** in the top right to test your assistant in real time.
2. When you are ready, click **Publish**. Your assistant is now live and answering customers automatically.
---
# SECTION 2: FLOW NODES
## AI Agent & Generation
> URL: /en/nodes/agent
> Specific llms.txt: /en/nodes/agent/llms.txt
import { ParamField, ResponseField } from '@site/src/components';
# Nodes: AI Agent & Generation
These blocks let your flows think, make intelligent decisions, and reply naturally using advanced AI models.
---
## 1. Agent Node (Intelligent Assistant)
The **Agent Node** acts as a trained virtual advisor. It can understand what the customer is asking, consult your product manuals, and decide which action to take (such as booking an appointment or saving a record) on its own.
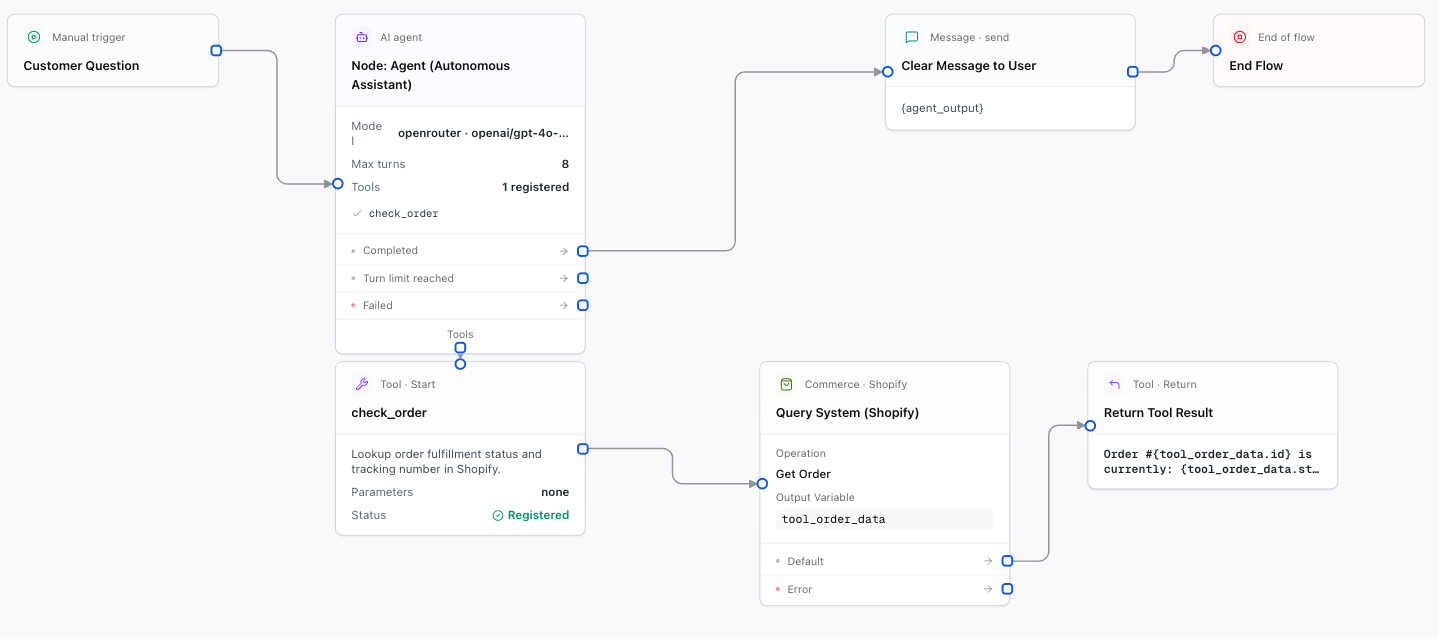
Mermaid
```text
graph TD
U[Customer Question] --> A[AI Assistant]
A -->|Lookup| T1[Check Calendar Availability]
T1 --> A
A -->|Action| T2[Save Record in Sheets]
T2 --> A
A -->|Reply| R[Clear Message to Customer]
```
### Configuration Fields
Main instructions for your assistant: role, communication tone (formal, friendly, direct), what to answer, and what not to answer.
The AI model that will process the messages (see [Artificial intelligence providers](/en/get-started/ai-providers) for the full list).
Creativity level of the replies. A low value (such as `0.2`) produces more precise, direct answers, while a high value produces more varied replies.
List of tools the assistant is allowed to use (for example: check a calendar or search a database).
---
## 2. Generate Node (Content Generator)
The **Generate Node** is used for single-step tasks: summarizing a long conversation, extracting specific data from text, or translating messages.
The instruction you want the AI to perform (e.g. `Summarize the following conversation in 3 key points: {chat_history}`).
Variable where the summary or generated text will be stored.
---
## CRM, Ecommerce, and Databases
> URL: /en/nodes/crm-ecommerce
> Specific llms.txt: /en/nodes/crm-ecommerce/llms.txt
import { ParamField } from '@site/src/components';
# Nodes: CRM and Ecommerce Integrations
Seamlessly connect conversations with your CRM, ecommerce store, and project databases.
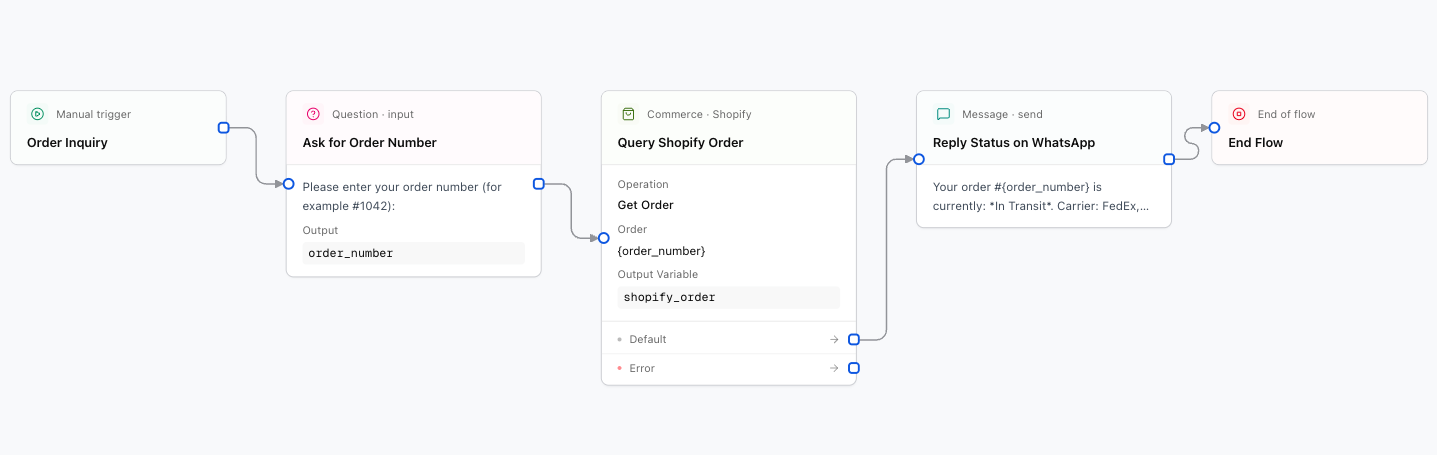
Mermaid
```text
graph LR
A[Customer asks for order status] --> B[Shopify / WooCommerce Node]
B -->|Lookup order by ID| C[Status: Out for Delivery]
C --> D[Send WhatsApp confirmation]
```
---
## 1. HubSpot CRM Node
Create or update contacts, log deals, and append call/chat notes in **HubSpot**.
### Designer Settings:
Operation: `upsertContact`, `createDeal`, `createNote`, `searchContact`.
Contact email address (e.g. `{user_email}`).
Customer first name (e.g. `{user_name}`).
Deal title (e.g., `Consulting Package - {user_name}`).
---
## 2. Shopify Node
Query products, lookup order tracking, and create draft orders in your **Shopify** store.
### Designer Settings:
Operation: `getOrder`, `searchProducts`, `createDraftOrder`.
Order number to look up (e.g. `{order_number}`).
---
## 3. WooCommerce Node
Query products, inspect order status, and create orders on your **WordPress / WooCommerce** store.
### Designer Settings:
Operation: `searchOrders`, `searchProducts`, `updateOrderStatus`, `createOrder`.
---
## 4. Airtable Node
Read, create, and update records inside your **Airtable** bases.
### Designer Settings:
Exact table name in Airtable (e.g. `Leads` or `Orders`).
JSON mapping of table columns to conversation variables.
---
## 5. Notion Node
Create pages, query databases, and append structured notes to **Notion**.
---
## Databases and Custom Code
> URL: /en/nodes/databases-code
> Specific llms.txt: /en/nodes/databases-code/llms.txt
import { ParamField } from '@site/src/components';
# Nodes: Databases and Custom Code
Store collected data directly inside Convoflow collections, connect to your own database, or execute simple JavaScript calculations when you need custom logic.
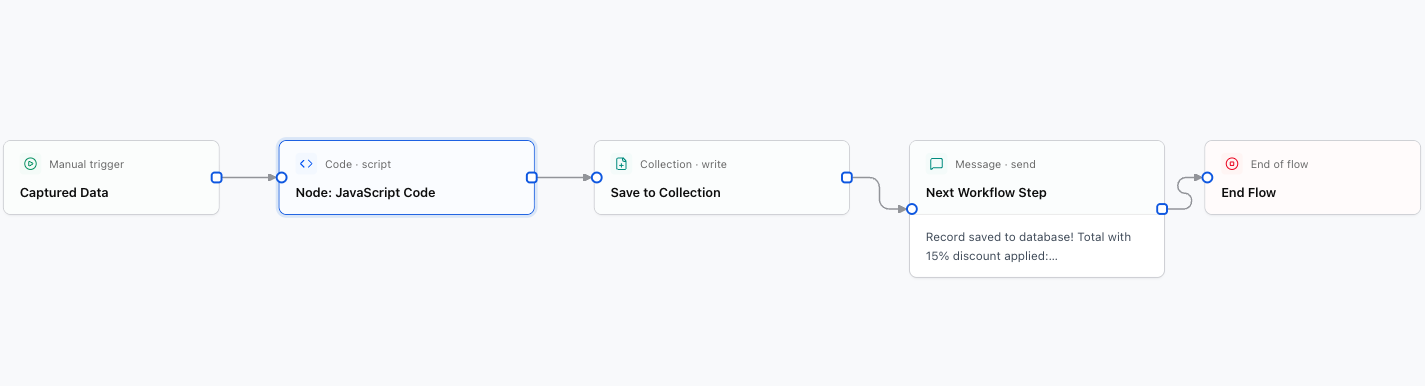
Mermaid
```text
graph LR
A[Captured Data] --> B[Collection Write Node]
B -->|Row Saved| C[Next Step]
B -->|Optional: Custom Logic| D[Code Node]
```
---
## 1. Internal Collections (Read & Write)
Collections are built-in tables hosted inside Convoflow, eliminating the need to set up external databases.
### Collection Write Node
Inserts or updates records in your internal tables.
Target collection (e.g. `Customers` or `Surveys`).
Map collection columns to conversation variables.
### Collection Read Node
Fetches records based on filters.
Variable storing the retrieved record.
---
## 2. PostgreSQL and Supabase Nodes
Run SQL queries or REST requests against your own infrastructure.
SQL statement with safe `{variable}` interpolation.
---
## 3. Code Node (Custom JavaScript)
Execute custom calculations or transformations. Variables are accessed via the `vars` object:
```javascript
const subtotal = Number(vars.order_subtotal) || 0;
const tax = subtotal * 0.16;
const total = subtotal + tax;
return { subtotal, tax, total };
```
---
## Email Node
> URL: /en/nodes/email
> Specific llms.txt: /en/nodes/email/llms.txt
import { ParamField, ResponseField } from '@site/src/components';
# Node: Email
The **Email Node** lets you send emails automatically from any step in your flow. Use it to confirm purchases, notify your team about a new lead, or send PDF receipts to customers.
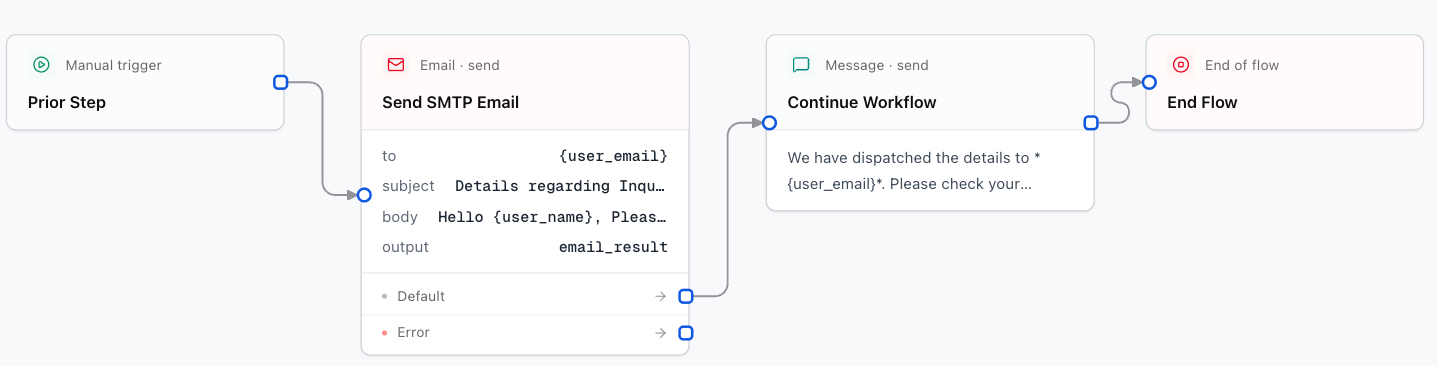
Mermaid
```text
graph LR
A[Previous Step] --> B[Email Node]
B -->|Send Email| C[Customer Receives Email]
B -->|Success| D[Continue Flow]
```
---
## Configuration Fields
Your email account or SMTP server registered under **Connections**.
Recipient email address. Use a fixed address or the variable where you stored the customer's email: `{user_email}`.
Email subject line. You can personalize it with variables such as: `Appointment confirmation - {user_name}`.
Message content. It can be plain text or a formatted template. Variables such as `{customer_name}` or `{service}` are supported.
Display name and address used as the sender (e.g. `Convoflow Team `).
Files to attach to the email:
```json
[
{
"filename": "summary.pdf",
"path": "https://yourserver.com/files/summary.pdf"
}
]
```
---
## Personalized Message Example
You can write the email body in plain language:
```text
Hi {user_name},
Your registration for {service_name} has been confirmed.
Date: {appointment_date}
Time: {appointment_time}
If you have any questions, reply directly to this email.
```
---
## Google Calendar Node
> URL: /en/nodes/google-calendar
> Specific llms.txt: /en/nodes/google-calendar/llms.txt
import { ParamField, ResponseField } from '@site/src/components';
# Node: Google Calendar
The **Google Calendar Node** lets your assistant book appointments, check free time on your calendar, and automatically generate **Google Meet** video links to send to your customers.
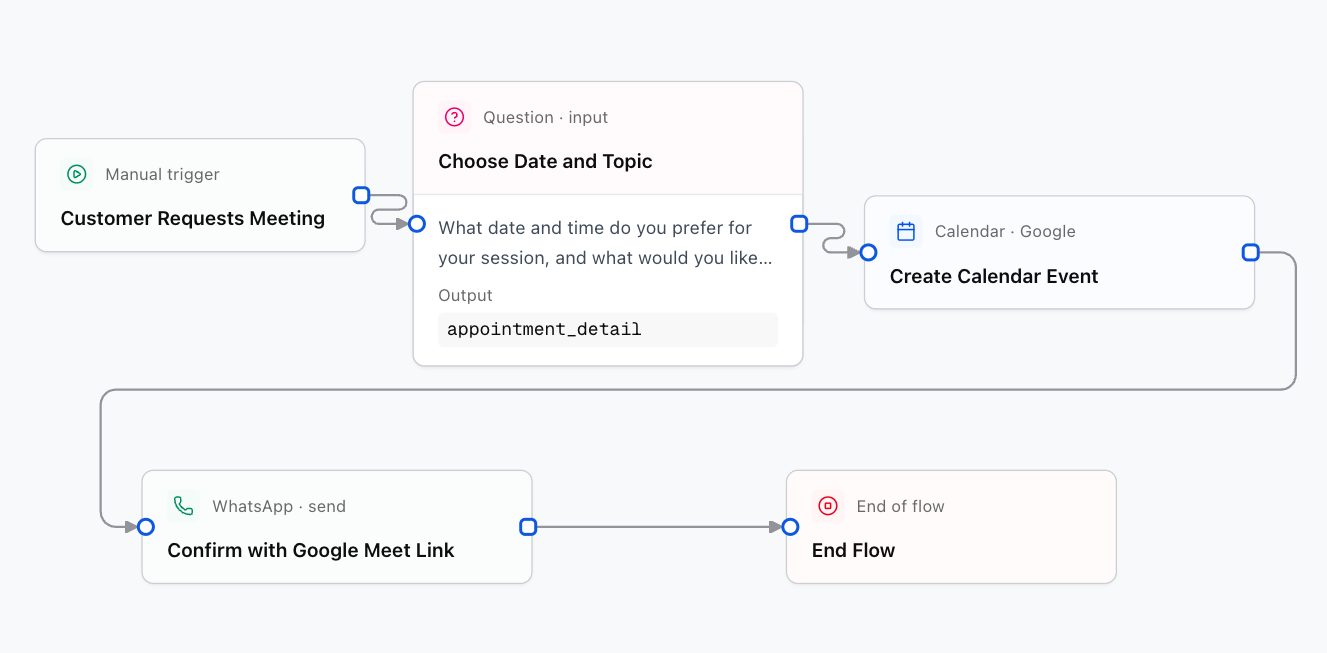
Mermaid
```text
graph LR
A[Customer requests a meeting] --> B[Google Calendar Node]
B -->|Check Availability| C[Create Event in Google Calendar]
C -->|Generate Google Meet| D[Send Link via WhatsApp / Email]
```
---
## What You Can Do with This Node
1. **Create an event (`createEvent`):** Book a meeting with date, time, customer name, and a Google Meet link.
2. **Check availability (`listEvents`):** Review scheduled meetings in a date range so you do not overlap appointments.
3. **Update an event (`updateEvent`):** Change the time or details of an existing appointment.
4. **Cancel an event (`deleteEvent`):** Cancel a calendar appointment if the customer reschedules or cancels.
---
## Configuration Fields
Your configured **Google Service Account** connection.
Use `primary` for your main calendar, or enter the email address of the calendar you want to manage (e.g. `sales@yourcompany.com`).
Action to perform: `createEvent` (Create appointment), `listEvents` (Check availability), or `deleteEvent` (Cancel appointment).
Event title that will appear on your calendar (e.g. `Initial consultation with {user_name}`).
Meeting start date and time (e.g. `{start_date}`).
Meeting end date and time (e.g. `{end_date}`).
Event time zone (e.g. `America/Mexico_City`, `America/Bogota`, `America/Santiago`, `Europe/Madrid`).
Enable this option so Google automatically creates a virtual **Google Meet** room.
Emails that will receive a formal Google calendar invitation:
```json
[
{ "email": "{user_email}", "displayName": "{user_name}" }
]
```
---
## How Automatic Scheduling Works
1. **The customer requests a slot:** *"I want to book a demo for Friday at 11 am"*.
2. **The assistant validates the date:** It checks that you have that slot free on your calendar.
3. **It creates the appointment:** It registers the meeting and includes the Google Meet room.
4. **It confirms to the user:** It immediately sends a message with the details:
```text
Done {user_name}! Your appointment has been booked successfully.
Google Meet link: {calendar_res.hangoutLink}
```
---
## Google Docs Node
> URL: /en/nodes/google-docs
> Specific llms.txt: /en/nodes/google-docs/llms.txt
import { ParamField, ResponseField } from '@site/src/components';
# Node: Google Docs
The **Google Docs Node** lets you read document content, append notes at the end of a file, or generate contracts and quotes by automatically replacing text tags.
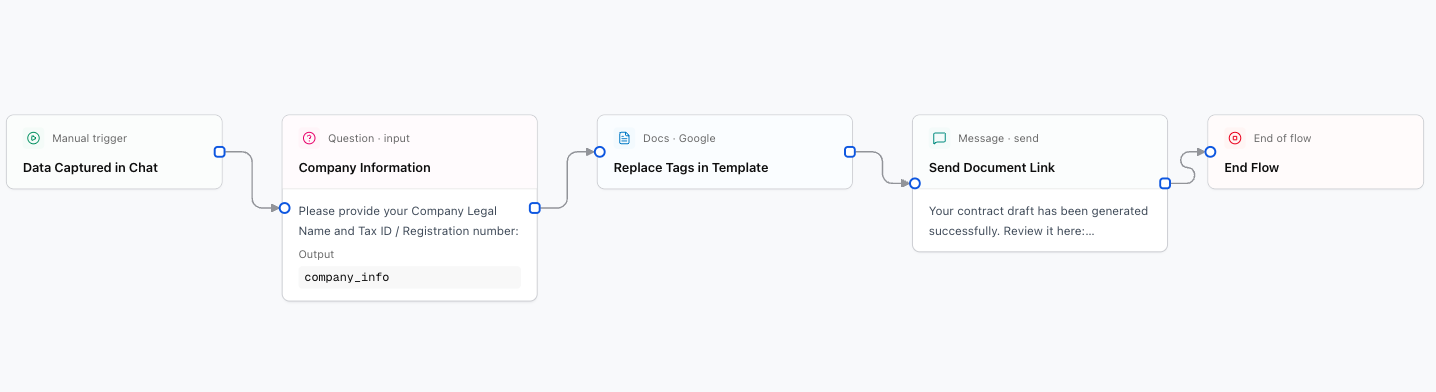
Mermaid
```text
graph LR
A[Captured Chat Data] --> B[Google Docs Node]
B -->|Replace Tags| C[Ready Contract or Proposal]
B -->|Success| D[Send Link to Customer]
```
---
## What You Can Do with This Node
1. **Read document (`readDocument`):** Extract text from a Google document so your AI assistant can analyze it or answer questions about it.
2. **Append text (`appendText`):** Write new notes, logs, or summaries at the end of an existing document.
3. **Replace text (`replaceText`):** Find keywords in a template (such as `[CUSTOMER]`) and replace them with real conversation data.
---
## Configuration Fields
Your configured **Google Service Account** connection.
Unique document ID from your browser URL:
`https://docs.google.com/document/d/`**`195j9eDD3thA495vD0KKC508YPNjFOO0GX64Zo2PP3hM`**`/edit`
Action to perform: `readDocument` (Read), `appendText` (Append text), or `replaceText` (Replace text).
The tag you placed in your Google Docs template, for example: `CUSTOMER_NAME` or `[CUSTOMER_NAME]`.
The real value that will replace the tag, for example: `{user_name}`.
Text to add at the end of the file when using the `appendText` operation.
Name of the variable where the operation result will be stored.
---
## How to Create Personalized Documents Step by Step
1. **Create your template in Google Docs:** Write your contract or proposal and insert easy-to-spot tags, for example `[CUSTOMER_NAME]`, `[PRICE]`, and `[DATE]`.
2. **Share the document:** Click **Share** in Google Docs and add your Google service account email with the **Editor** role.
3. **Configure the node:** Add the nodes needed in your flow to replace each tag with the information collected from the user.
4. **Send the result:** Notify your customer by WhatsApp or email that their document is ready.
---
## Google Sheets Node
> URL: /en/nodes/google-sheets
> Specific llms.txt: /en/nodes/google-sheets/llms.txt
import { ParamField, ResponseField } from '@site/src/components';
# Node: Google Sheets
The **Google Sheets Node** allows your assistant to save customer information, search inventory or order statuses, and update spreadsheet rows in real time.
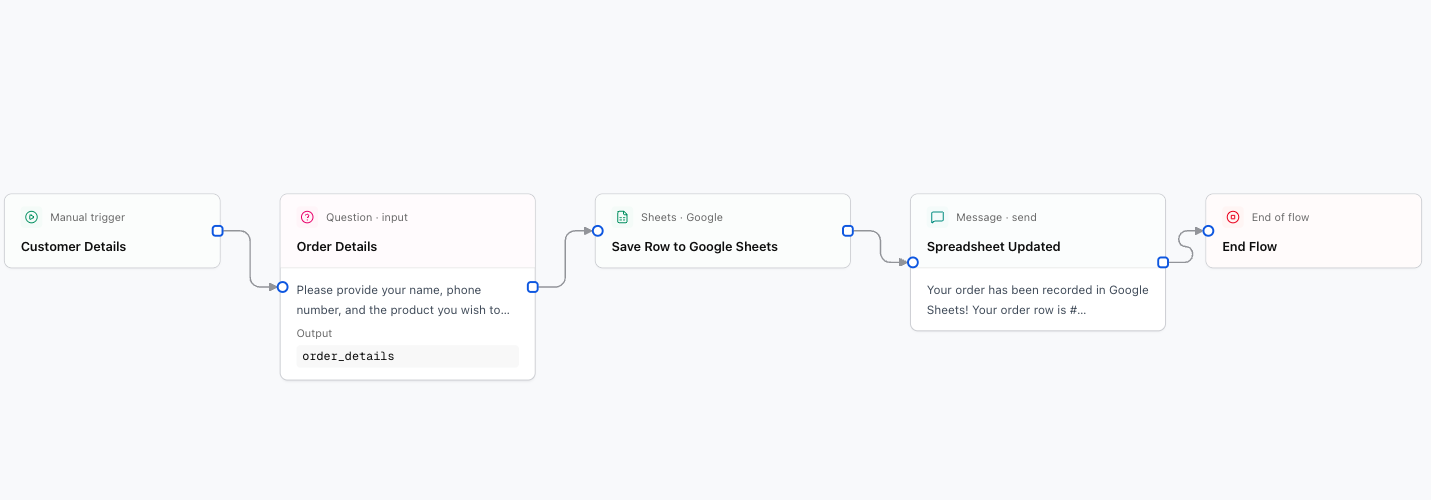
Mermaid
```text
graph LR
A[Customer Information] --> B[Google Sheets Node]
B -->|Insert Row| C[Spreadsheet Updated]
B -->|Success| D[Next Flow Step]
```
---
## What You Can Do with This Node
1. **Find rows (`findRows`):** Look up rows matching a specific phone number, email, or order ID.
2. **Insert rows (`insertRows`):** Append new customer entries to your sheet.
3. **Update rows (`updateRows`):** Modify existing columns (e.g. changing status to "Completed").
4. **Delete rows (`deleteRows`):** Remove rows matching specific criteria.
---
## Configuration Fields
Your configured **Google Service Account** connection.
Unique spreadsheet ID found in your browser URL:
`https://docs.google.com/spreadsheets/d/`**`1BxiMVs0XRA5nFMdKvBdBZjgmUUqptlbs74OgvE2upms`**`/edit`
Name of the tab inside the sheet (e.g. `Leads`, `Sales`, `Sheet1`).
Action to perform: `findRows` (Find), `insertRows` (Insert), `updateRows` (Update), or `deleteRows` (Delete).
Data to append to the spreadsheet. Keys must match your column names:
```json
[
{
"Date": "{current_date}",
"Name": "{user_name}",
"Phone": "{user_phone}",
"Service": "{service_interest}"
}
]
```
Search criteria used to find a specific row:
```json
{
"Phone": "{user_phone}"
}
```
Name of the variable to store the result for subsequent blocks.
---
## Practical Examples
### Example 1: Save a new contact from WhatsApp
When a user finishes submitting their details in the chat, the node appends a new row to your sheet:
- **Operation:** `insertRows`
- **Spreadsheet ID:** Your Google Sheets ID
- **Tab:** `Leads`
- **Data to insert:**
```json
[
{
"Date": "{current_date}",
"Name": "{user_name}",
"Phone": "{user_phone}",
"Status": "New"
}
]
```
---
### Example 2: Look up an order status
To answer a customer about their delivery status:
1. Find the row by tracking number:
```json
{
"TrackingNumber": "{tracking_number}"
}
```
2. In the next message, reply:
```text
Hi {sheets_result.rows.0.values.Name}, your order status is: {sheets_result.rows.0.values.Status}.
```
---
## Important Permission in Google Drive
:::important Share the sheet with your service account
Open your Google Sheet, click **Share**, and add your service account email (ending in `@...gserviceaccount.com`) with the **Editor** role.
:::
---
## HTTP & System Requests
> URL: /en/nodes/http
> Specific llms.txt: /en/nodes/http/llms.txt
import { ParamField, ResponseField } from '@site/src/components';
# Node: HTTP & System Connections
The **HTTP Node** lets Convoflow talk to your own systems, online stores (Shopify, WooCommerce), payment platforms, or management systems (CRM, ERP).
---
## Configuration Fields
The API or system URL to call (e.g. `https://api.yourcompany.com/orders/{order_id}`).
The action type:
- `GET`: Query and retrieve data.
- `POST`: Send or register new data.
- `PUT` / `PATCH`: Update existing information.
- `DELETE`: Remove a record.
If your system requires securely stored credentials, select your [Webhooks & HTTP APIs](/en/connections/webhooks-http) connection.
Data you will send to the system (for `POST` or `PUT` methods):
```json
{
"customer": "{user_name}",
"phone": "{user_phone}",
"total": "{order_total}"
}
```
Variable where the response from your system will be stored.
---
## Human Handoff and Teams
> URL: /en/nodes/human-handoff
> Specific llms.txt: /en/nodes/human-handoff/llms.txt
import { ParamField } from '@site/src/components';
# Nodes: Human Handoff and Team Collaboration
While AI handles most inquiries effortlessly, some situations require human assistance or manager authorization.
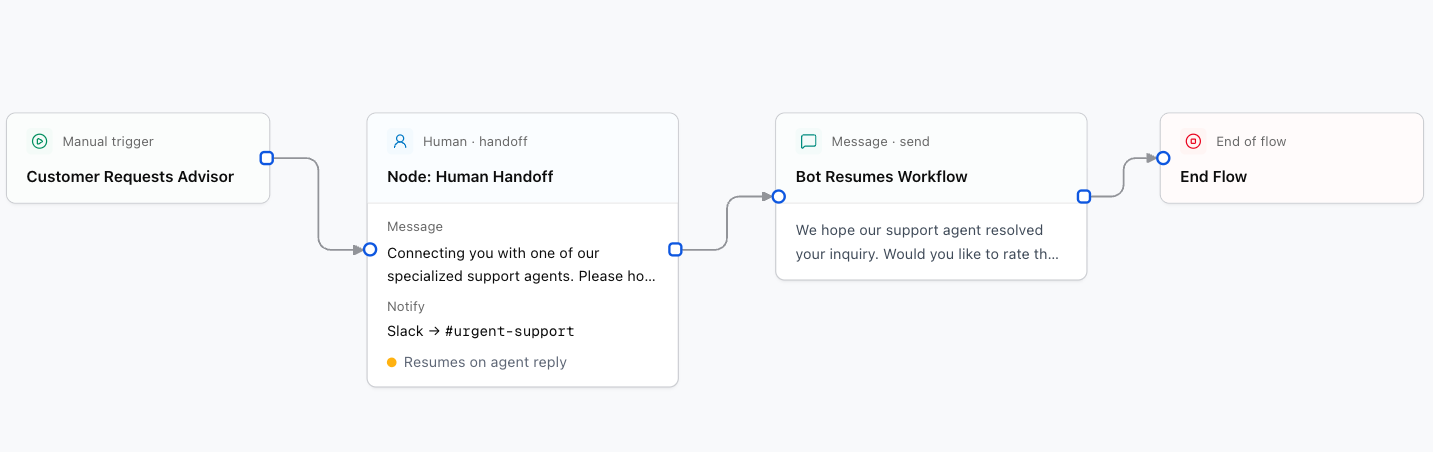
Mermaid
```text
graph LR
A[Customer requests human] --> B[Human Handoff Node]
B -->|Pause bot| C[Agent replies in CRM]
C -->|Optional: Resume| D[Bot resumes flow]
```
---
## 1. Human Handoff Node
Pauses the automated flow and routes the conversation to your human team's inbox inside the Convoflow CRM.
### Designer Settings:
Message sent to the user before transferring (e.g., *Transferring you to an advisor, please hold on...*).
Channel to notify your team: `slack`, `email`, `whatsapp`, or `none`.
Notification destination (e.g. `#urgent-support`, `support@company.com`).
If enabled, the flow resumes automatically when the human agent replies in the CRM.
---
## 2. Approval Node
Pauses the flow until a manager or role approves or denies a sensitive action (e.g. issuing a refund or custom discount).
### Canvas Branches:
- **Approved (`approved`):** Path followed if the manager approves.
- **Rejected (`rejected`):** Path followed if the manager declines.
Target role required for approval (e.g. `supervisor`, `sales_lead`).
Question shown to the manager (e.g., `Do you approve a {discount_amount} discount for {user_name}?`).
---
## 3. Assign Role
Assigns the conversation to a specific department or role in the CRM (e.g., `sales`, `support`, `billing`).
The name of the role (e.g., `sales`, `tier2_support`).
---
## Node Catalog
> URL: /en/nodes
> Specific llms.txt: /en/nodes/llms.txt
import { Card, CardGrid } from '@site/src/components';
# Nodes and Visual Building Blocks
**Nodes** are the visual blocks you drag and connect on the Convoflow canvas. Each node performs a specific task: sending a message, asking a question, querying a database, charging a customer, or making an AI-powered decision.
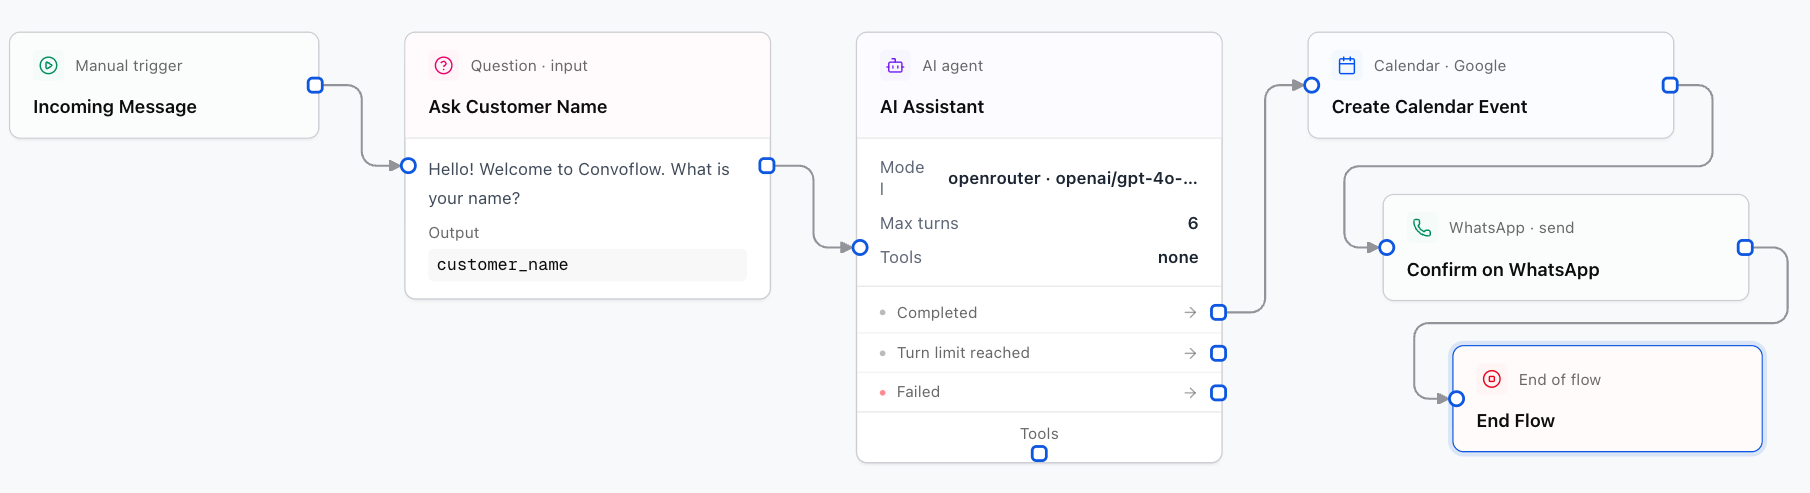
Mermaid
```text
graph LR
A[Incoming Message] --> B[Ask Name]
B --> C[AI Assistant]
C -->|Schedule| D[Book in Calendar]
D -->|Success| E[Confirm via WhatsApp]
D -->|No Availability| F[Email Advisor]
```
---
## How Nodes Work in the Designer
### 1. The Visual Canvas and Designer
Convoflow's Designer helps you build and modify flows quickly. This documentation serves as your **reference guide** when you click on a node in the canvas to adjust its properties.
### 2. Reusing Conversation Data
Insert values collected earlier into messages or emails using curly braces `{}`:
```text
Hello {user_name}, your booking is confirmed for {appointment_date} at {appointment_time}.
```
---
## Complete Node Catalog
Learn how flows start, finish, and activate via WhatsApp, Email, or Cron schedules.
Send text messages, media, and official WhatsApp interactive buttons.
Collect user answers with auto-validation and manage workflow variables.
Autonomous agents with memory, goal planning, and visual tool sub-flows.
Answer queries from PDF manuals, browse the web, or extract text with Document AI.
Branch flows using logical rules, AI intent conditions, or multi-case switches.
Transfer chats to human agents, request manager approvals, and assign CRM roles.
Send internal sales alerts, purchase notifications, and channel updates.
Collect payments with Stripe and Recurrente with interactive WhatsApp CTA buttons.
Send SMS OTP codes and verify official IDs with biometric KYC.
Manage Google Calendar, Cal.com bookings, or use autonomous agentic calendar loops.
Read, insert, update, or delete spreadsheet rows in real time.
Generate documents, contracts, and proposals by replacing text templates.
Send personalized emails with design templates and file attachments.
Sync contacts with HubSpot, check Shopify or WooCommerce orders, Airtable and Notion.
Store data in internal Convoflow tables, query PostgreSQL, Supabase, or run JavaScript.
Connect your flow to any external REST API or webhook.
---
## Knowledge Base
> URL: /en/nodes/knowledge
> Specific llms.txt: /en/nodes/knowledge/llms.txt
import { ParamField, ResponseField } from '@site/src/components';
# Node: Knowledge Base
The **Knowledge Base Node** lets your AI assistant consult your company documentation (PDF manuals, service policies, FAQs, or web pages) to answer users with accurate, real information from your business.
---
## How It Works
1. **You upload your documents:** You load your files in the Convoflow content manager.
2. **The user asks a question:** *"What are your business hours and return policies?"*.
3. **The node searches your files:** It finds the exact paragraphs that contain the answer.
4. **The assistant replies:** It writes a friendly, accurate answer using only the data from your documents.
---
## Configuration Fields
Select the document base you want your assistant to consult.
The question or topic to search in the documents (usually `{last_user_message}`).
Maximum number of relevant fragments or sections to extract from the documents.
Name of the variable where the found information will be stored so the assistant can use it when answering.
---
## Logic & Decisions
> URL: /en/nodes/logic
> Specific llms.txt: /en/nodes/logic/llms.txt
import { ParamField } from '@site/src/components';
# Nodes: Logic & Flow Control
Logic nodes let you create branches in your flow. For example: send a user down one path if they are a new customer and another if they are a returning customer.
---
## 1. Condition Node (Direct Condition)
Evaluates whether a value matches a fixed rule (for example: if the balance is greater than 0, or if the country is Mexico):
- **Available rules:** equals, not equals, contains, greater than, less than, is empty.
- **Resulting branches:**
- **Yes (True):** If the condition is met.
- **No (False):** If the condition is not met.
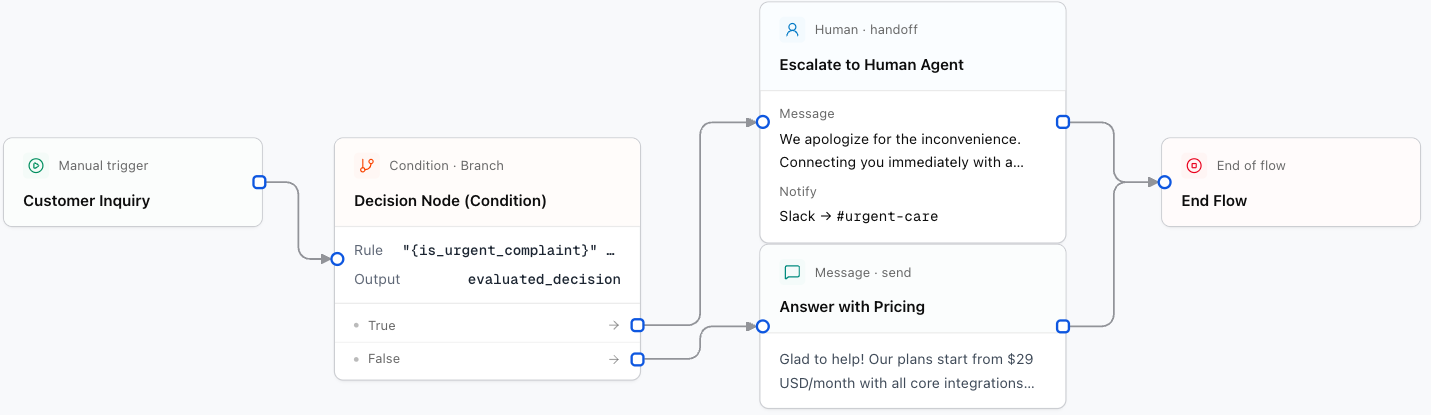
Mermaid
```text
graph LR
A[Condition Node] -->|Balance greater than 0| B[Path: Payment Reminder]
A -->|Balance equals 0| C[Path: Account Up to Date]
```
---
## 2. Smart Condition Node (AI-Powered Condition)
Uses Artificial Intelligence to understand the meaning of a message when the user writes in their own words:
Natural-language question for the AI (e.g. *Is the user upset or asking to speak with a human?*).
Possible paths to take (e.g. `talk_to_agent`, `general_inquiry`, `compliment`).
---
## 3. Switch Node (Multiple-Option Menu)
Compares a variable against several fixed options (for example: Option 1 for Sales, Option 2 for Support, Option 3 for Billing).
---
## Payments and Checkout
> URL: /en/nodes/payments
> Specific llms.txt: /en/nodes/payments/llms.txt
import { ParamField } from '@site/src/components';
# Nodes: Payments and Checkout (Stripe & Recurrente)
Payment nodes allow your assistant to collect payments for orders, appointments, or deposits directly within chat conversations.
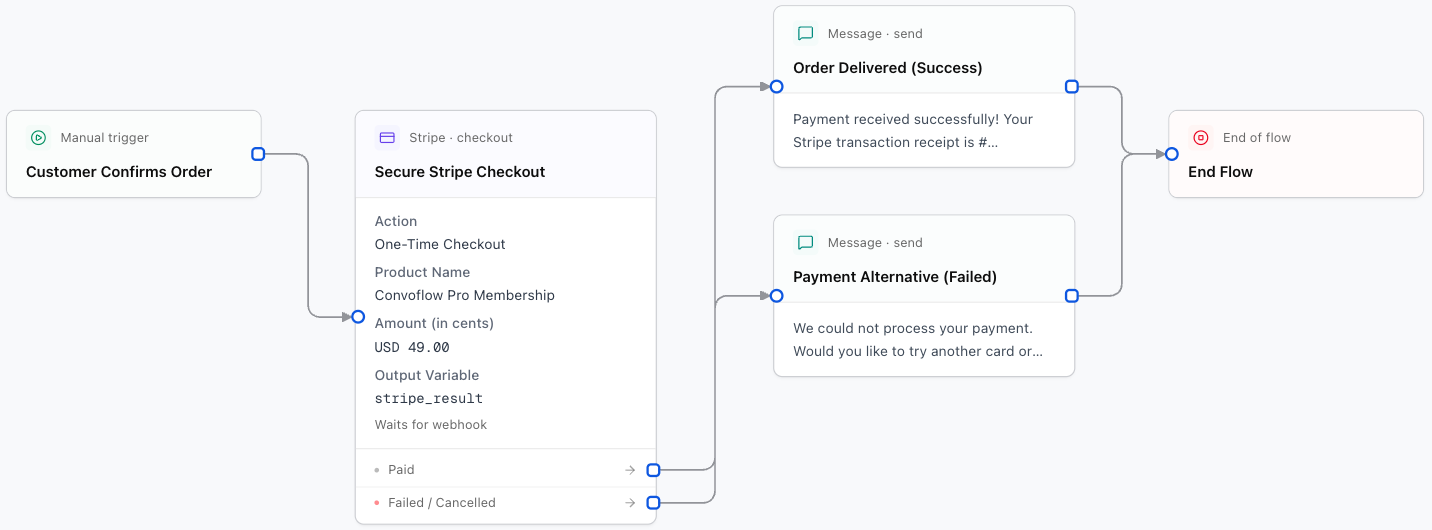
Mermaid
```text
graph LR
A[Order Confirmed] --> B[Payment Node: Stripe / Recurrente]
B -->|WhatsApp CTA Button| C[Customer completes payment]
C -->|Webhook Confirmation| D[Resume: Fulfill Order]
```
---
## 1. Stripe Payment Node
Generates a secure **Stripe Checkout** session for credit card, debit card, Apple Pay, and Google Pay transactions worldwide.
### Designer Settings:
Your connected Stripe account.
Line item title shown during checkout (e.g. `Appointment Booking - {user_name}`).
Price in cents (e.g. `2500` for $25.00, `10000` for $100.00).
Currency code in lowercase (e.g. `usd`, `eur`, `mxn`).
- **Enabled (Recommended):** Sends an interactive WhatsApp CTA button, pauses the flow, and resumes upon webhook payment confirmation.
- **Disabled:** Generates checkout URL and continues immediately.
WhatsApp interactive CTA button label (maximum 20 characters).
---
## 2. Recurrente Payment Node
Optimized for processing local payments in **Guatemala and Central America** (in Quetzales `GTQ` or Dollars `USD`).
### Designer Settings:
Action: `create_one_time_checkout` or `create_checkout`.
Amount in cents (e.g. `10000` for Q100.00 or $100.00).
Currency: `GTQ` (Quetzales) or `USD` (US Dollars).
Pauses the conversation and resumes when Recurrente reports payment outcome via webhook.
---
## Question & User Wait
> URL: /en/nodes/question
> Specific llms.txt: /en/nodes/question/llms.txt
import { ParamField, ResponseField } from '@site/src/components';
# Node: Question & Data Capture
The **Question** node lets you ask the user a question and pause the flow until they reply. It can also automatically verify that the entered text is a real email, a valid number, or a date.
---
## Configuration Fields
The message or question the user will see in the chat.
The data type you expect to receive so it can be validated before continuing:
- `text`: Any free text.
- `email`: Checks that it has a valid email format.
- `phone`: Verifies and formats phone numbers.
- `number`: Ensures the user enters numbers (such as amounts or quantities).
- `date`: Identifies dates (such as "tomorrow", "next Monday", or "May 15").
- `file`: Waits for the user to attach a file or image.
The variable name where the answer will be stored (e.g. `customer_email`).
Number of attempts the user has if they enter invalid data before being routed to an agent or alternative branch.
Friendly message shown if the data is incorrect (e.g. *Please check your email and enter it again.*).
---
## Slack and Discord
> URL: /en/nodes/team-chat
> Specific llms.txt: /en/nodes/team-chat/llms.txt
import { ParamField } from '@site/src/components';
# Nodes: Slack and Discord (Internal Notifications)
Keep your team updated in real time. Use Slack and Discord nodes to notify sales channels when a qualified lead arrives, or notify support of urgent issues.
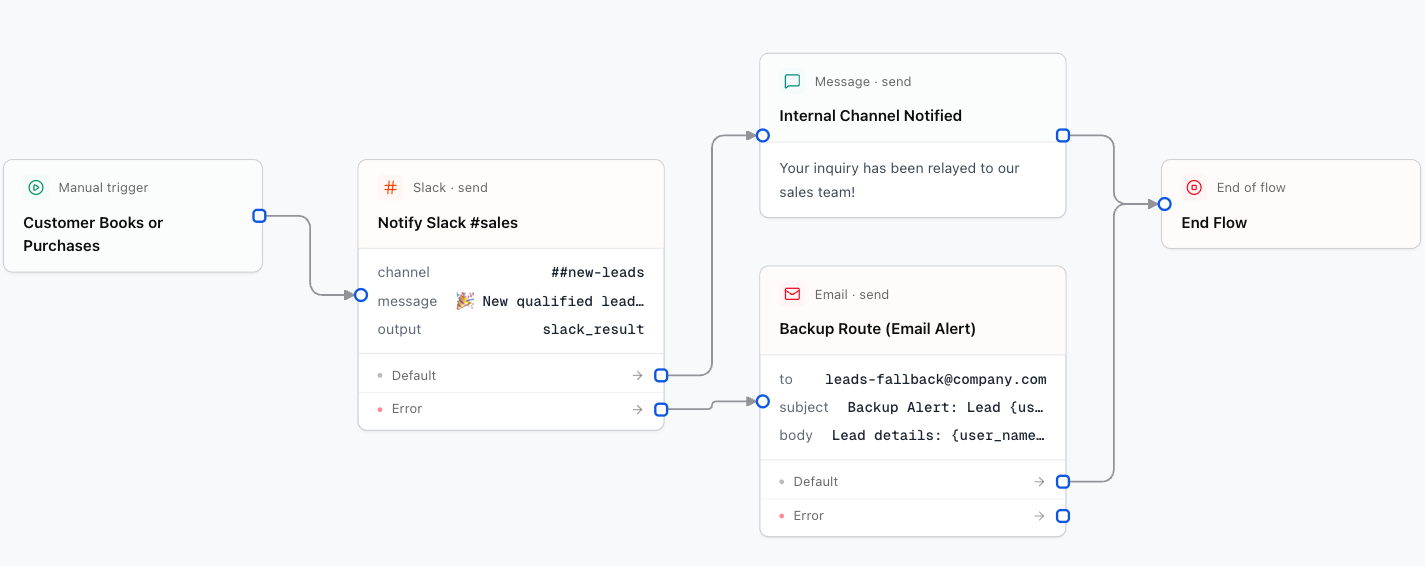
Mermaid
```text
graph LR
A[Customer schedules demo] --> B[Slack / Discord Node]
B -->|Post alert| C[Internal team channel]
B -->|Fallback on error| D[Error branch]
```
---
## 1. Slack Node
Sends a formatted message to any public or private Slack channel.
### Designer Settings:
Channel name (e.g. `#sales-leads`) or internal channel ID.
Message content. Supports `{variables}` and Slack markdown formatting:
```text
🚀 *New Qualified Lead*
- Name: {user_name}
- Phone: {user_phone}
- Interest: {selected_plan}
```
Thread timestamp to reply within an existing thread.
---
## 2. Discord Node
Sends notifications to Discord channels using a connected bot or a webhook URL.
### Designer Settings:
Target Discord channel ID (when using Bot connection).
Discord incoming webhook URL fallback.
Message content to post.
---
## Start, End, and Triggers
> URL: /en/nodes/triggers
> Specific llms.txt: /en/nodes/triggers/llms.txt
import { ParamField } from '@site/src/components';
# Nodes: Start, End, and Triggers
Every workflow in Convoflow needs a starting point and a conclusion. In addition to manual or chat-initiated conversations, you can trigger flows automatically via **Triggers** when an external event occurs.
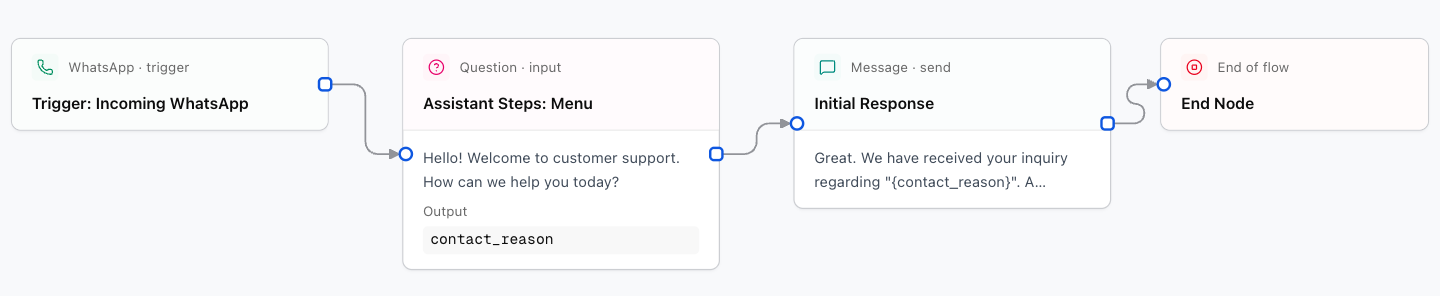
Mermaid
```text
graph LR
A[Trigger: Incoming WhatsApp] --> B[Start Node]
B --> C[Assistant Steps...]
C --> D[End Node]
```
---
## 1. Start Node
Marks where execution begins. When a user interacts with your assistant, the workflow starts from this node and follows the connected path.
### Designer Settings:
- **Label:** Descriptive name to identify the node on your canvas (e.g., *Customer Service Start*).
> **Design Tip:** You only need **one Start Node** per main flow. Connect it to the first actionable node (such as a greeting or question).
---
## 2. End Node
Marks the definitive completion of the flow. When the conversation reaches this node, the current process ends.
---
## 3. WhatsApp Trigger
Wakes up the flow automatically when an incoming message arrives at your WhatsApp number.
### Designer Settings:
Select the WhatsApp connection to listen on.
Keyword or substring required to activate this flow (e.g. *hello*, *pricing*, *support*). If empty, triggers on any incoming message.
Variable name where the incoming message text is stored.
Variable name where the sender phone number is stored.
---
## 4. Email Trigger
Starts the flow automatically when an incoming email matches specified filters.
### Designer Settings:
Filter emails from a specific sender or domain.
Text that must appear in the email subject.
Variable storing the received email body content.
---
## 5. Schedule Trigger
Runs a flow periodically based on a defined schedule or interval.
### Designer Settings:
Schedule mode: `daily_time` (daily at specified time), `interval_minutes` (every X minutes), or `cron`.
Your local time zone for schedule evaluation.
---
## Identity Verification and OTP
> URL: /en/nodes/verification
> Specific llms.txt: /en/nodes/verification/llms.txt
import { ParamField } from '@site/src/components';
# Nodes: Verification and Security
When handling sensitive transactions, accounts, or contracts, these nodes verify that users are genuine and protect your workflow from fraud.
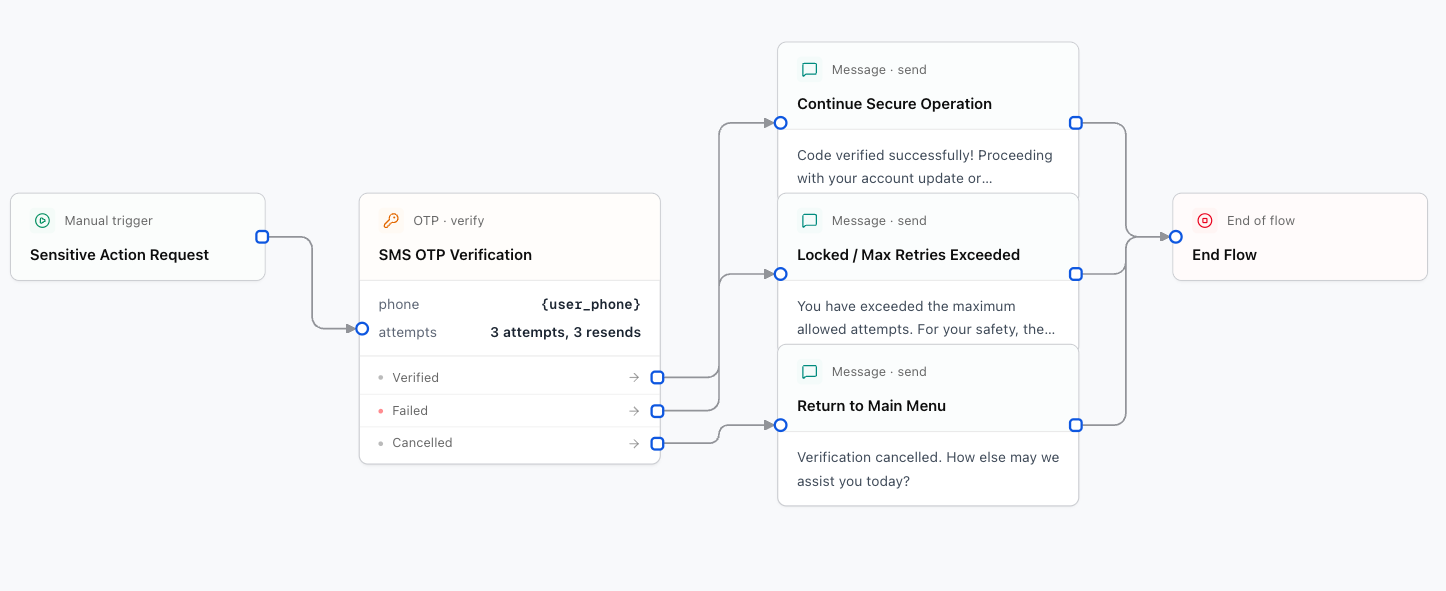
Mermaid
```text
graph LR
A[Sensitive Request] --> B[Verification Node]
B -->|Verified| C[Proceed Securely]
B -->|Exceeded Attempts| D[Block or Escalate]
B -->|User Cancels| E[Return to Menu]
```
---
## 1. OTP Verification Node (SMS Code)
Sends a 6-digit one-time password via SMS to the customer's phone number and validates their reply in the chat.
### Canvas Branches:
- **Verified:** Code matched successfully.
- **Failed:** User exceeded maximum incorrect attempts.
- **Cancel:** User chose to cancel verification.
### Designer Settings:
Variable containing the recipient's phone number (e.g. `{user_phone}`).
Prompt asking for the code (e.g., *We sent a 6-digit code via SMS. Please enter it here:*).
Maximum incorrect code attempts before routing to the failed branch.
---
## 2. KYC Verification Node (Official ID & Selfie)
Initiates a **Know Your Customer (KYC)** flow where the user submits photos of their government ID (passport, national ID, driver's license) and a live selfie.
### Designer Settings:
Your Convoflow KYC connection.
Verification workflow template ID.
In WhatsApp, sends a CTA button (*"Verify identity"*) opening the in-app webview.
---
## WhatsApp & Messaging
> URL: /en/nodes/whatsapp
> Specific llms.txt: /en/nodes/whatsapp/llms.txt
import { ParamField, ResponseField } from '@site/src/components';
# Nodes: WhatsApp & Messaging
Convoflow provides two nodes to talk to your users: the **Message Node** (any channel) and the **WhatsApp Node** (interactive features exclusive to WhatsApp).
---
## 1. Message Node (General Message)
Sends a text reply on the channel where the user is chatting (WhatsApp, website chat, and more).
The text sent to the user. You can use asterisks for `*bold*` and underscores for `_italics_`, plus variables such as `{user_name}`.
Time in milliseconds that simulates a "typing..." state before delivering the reply, so the conversation feels more natural.
---
## 2. WhatsApp Node (Interactive Features)
Sends quick-reply buttons, dropdown lists, and files on official WhatsApp accounts.
Your connected **WhatsApp Cloud API** account.
Type of message to send:
- `text`: Simple text message.
- `interactive_buttons`: Quick-reply buttons (up to 3 options).
- `interactive_list`: Dropdown menu with structured options.
- `media`: Images, audio, or PDF documents.
Button options the customer can tap:
```json
[
{ "id": "btn_sales", "title": "Talk to Sales" },
{ "id": "btn_support", "title": "Technical Support" }
]
```
---
# SECTION 3: CONNECTIONS
## Databases
> URL: /en/connections/database
> Specific llms.txt: /en/connections/database/llms.txt
import { ParamField } from '@site/src/components';
# Connection: Databases
This connection lets your assistants query databases to review product catalogs, check inventory, or store customer records.
---
## 1. Supabase
The web address of your Supabase project (e.g. `https://xyzproject.supabase.co`).
Your secret API key (`service_role` or `anon`) from the API settings of your Supabase project.
---
## 2. Direct PostgreSQL
Connect any standard PostgreSQL database.
Database connection string:
```text
postgresql://user:password@host.example.com:5432/database_name?sslmode=require
```
---
## 3. Airtable
Personal access token generated in the Airtable developer settings.
Unique identifier of your Airtable base (starts with `app...`).
---
## Email & SMTP
> URL: /en/connections/email-smtp
> Specific llms.txt: /en/connections/email-smtp/llms.txt
import { ParamField } from '@site/src/components';
# Connection: Email & SMTP Servers
This connection lets Convoflow send automatic emails to your customers or notifications to your team.
---
## Configuration Fields
Email server address (e.g. `smtp.gmail.com`, `smtp.sendgrid.net`, or `smtp.resend.com`).
Secure communication port:
- `465`: Recommended secure connection (SSL).
- `587`: Alternative connection (TLS/STARTTLS).
Your user email or account identifier (e.g. `notifications@yourcompany.com`, or `apikey` for SendGrid).
Your app password or API key generated by your email provider.
Sender name and email that customers will see (e.g. `Convoflow Support `).
---
## Setup with Popular Providers
### 1. Gmail or Google Workspace
- **Server (Host):** `smtp.gmail.com`
- **Port:** `465`
- **User:** Your Google email (e.g. `you@gmail.com`).
- **Password:** A 16-character **App Password** generated from your Google account security settings.
:::tip How to generate a Google App Password
Go to [myaccount.google.com/apppasswords](https://myaccount.google.com/apppasswords) with your Google account, enter a name such as "Convoflow", generate the 16-character password, and paste it into the password field.
:::
### 2. Resend
- **Server (Host):** `smtp.resend.com`
- **Port:** `465`
- **User:** `resend`
- **Password:** Your Resend API key.
### 3. SendGrid
- **Server (Host):** `smtp.sendgrid.net`
- **Port:** `465` or `587`
- **User:** `apikey`
- **Password:** Your SendGrid API key.
---
## Google Service Account
> URL: /en/connections/google-service-account
> Specific llms.txt: /en/connections/google-service-account/llms.txt
import { ParamField } from '@site/src/components';
# Connection: Google Service Account
The **Google Service Account** connection lets your flows interact directly with your Google tools:
- **Google Sheets:** Save new leads, update inventory, and read data.
- **Google Docs:** Generate contracts or documents by filling templates.
- **Google Calendar:** Check available times and book appointments with a Google Meet link.
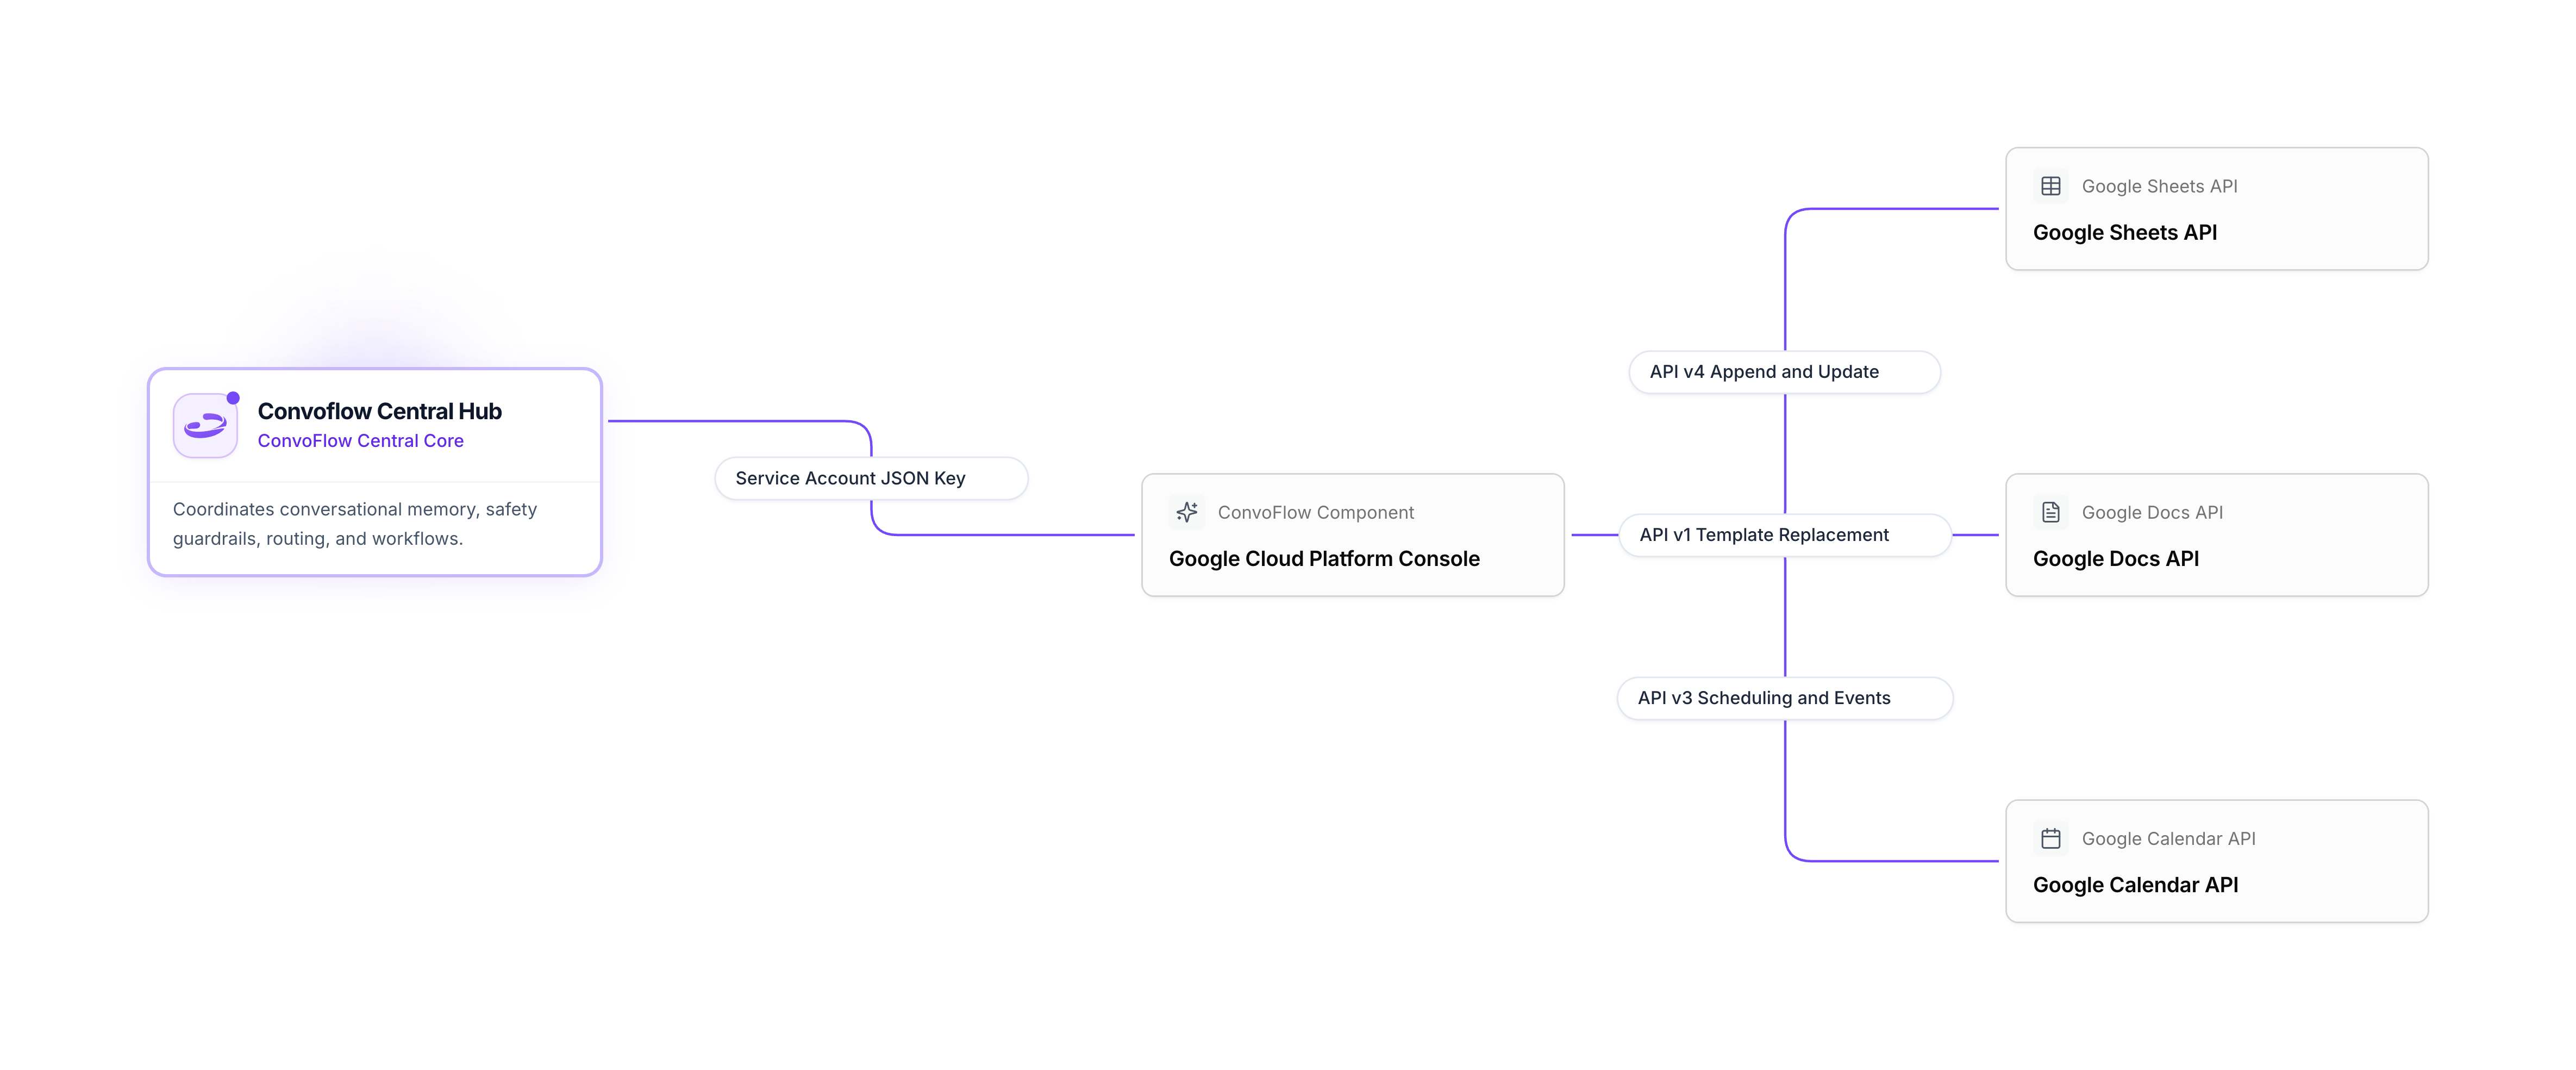
Mermaid
```text
graph LR
A[Convoflow] -->|Secure Connection| B[Google Cloud]
B --> C[Google Sheets]
B --> D[Google Docs]
B --> E[Google Calendar]
```
---
## Configuration Parameters
Paste the full contents of the `.json` file you download from Google Cloud (it includes the private key and service email).
Optional Google Workspace corporate email on whose behalf you want events or documents to be created.
---
## Step-by-Step Guide to Connect Google
### 1. Open Google Cloud Console
1. Go to the [Google Cloud Console](https://console.cloud.google.com/).
2. Sign in with your Google account and create a new project (e.g. *Convoflow Automations*).
### 2. Enable Google Tools (APIs)
In the Google Cloud search bar, find and click **Enable** for each of these tools:
- **Google Sheets API** (spreadsheets).
- **Google Docs API** (documents).
- **Google Calendar API** (appointment scheduling).
- **Google Drive API** (file permissions).
### 3. Create a Service Account
1. Go to **IAM & Admin > Service Accounts**.
2. Click **Create service account**.
3. Enter an identifier name (e.g. `convoflow-assistant`) and click **Done**.
### 4. Download the JSON Key
1. In the service account list, click the email that was just created (it will look like `convoflow-assistant@your-project.iam.gserviceaccount.com`).
2. Open the **Keys** tab.
3. Click **Add key > Create new key**.
4. Choose the **JSON** format and press **Create**. A file will download to your computer.
5. Open that file in any text editor, copy all of its contents, and paste it into the **Service Account JSON** field in Convoflow.
### 5. Grant Access to Your Documents and Calendars
This is the most important step to make everything work:
- **For Google Sheets and Google Docs:** Open your sheet or document, click **Share**, paste the service account email (the one ending in `...iam.gserviceaccount.com`), and grant **Editor** access.
- **For Google Calendar:** Open Google Calendar on your computer, go to the settings of the calendar you will use, open **Share with specific people**, and add the service account email with permission to *Make changes to events*.
---
## Frequently Asked Questions and Fixes
:::note Permission error ("The caller does not have permission")
**Cause:** You have not shared the spreadsheet or calendar with the service email.
**Fix:** Copy the `client_email` from your JSON file and share it with Editor access on your Google Drive file.
:::
:::note API not enabled error
**Cause:** The API is not enabled in Google Cloud.
**Fix:** Go to the API library in Google Cloud and press **Enable** on *Google Sheets API* or *Google Calendar API*.
:::
---
## Introduction to Connections
> URL: /en/connections
> Specific llms.txt: /en/connections/llms.txt
import { Card, CardGrid } from '@site/src/components';
# Centralized Connections
**Connections** in Convoflow securely store and manage your credentials, passwords, and API keys so your assistants can interact with third-party tools.
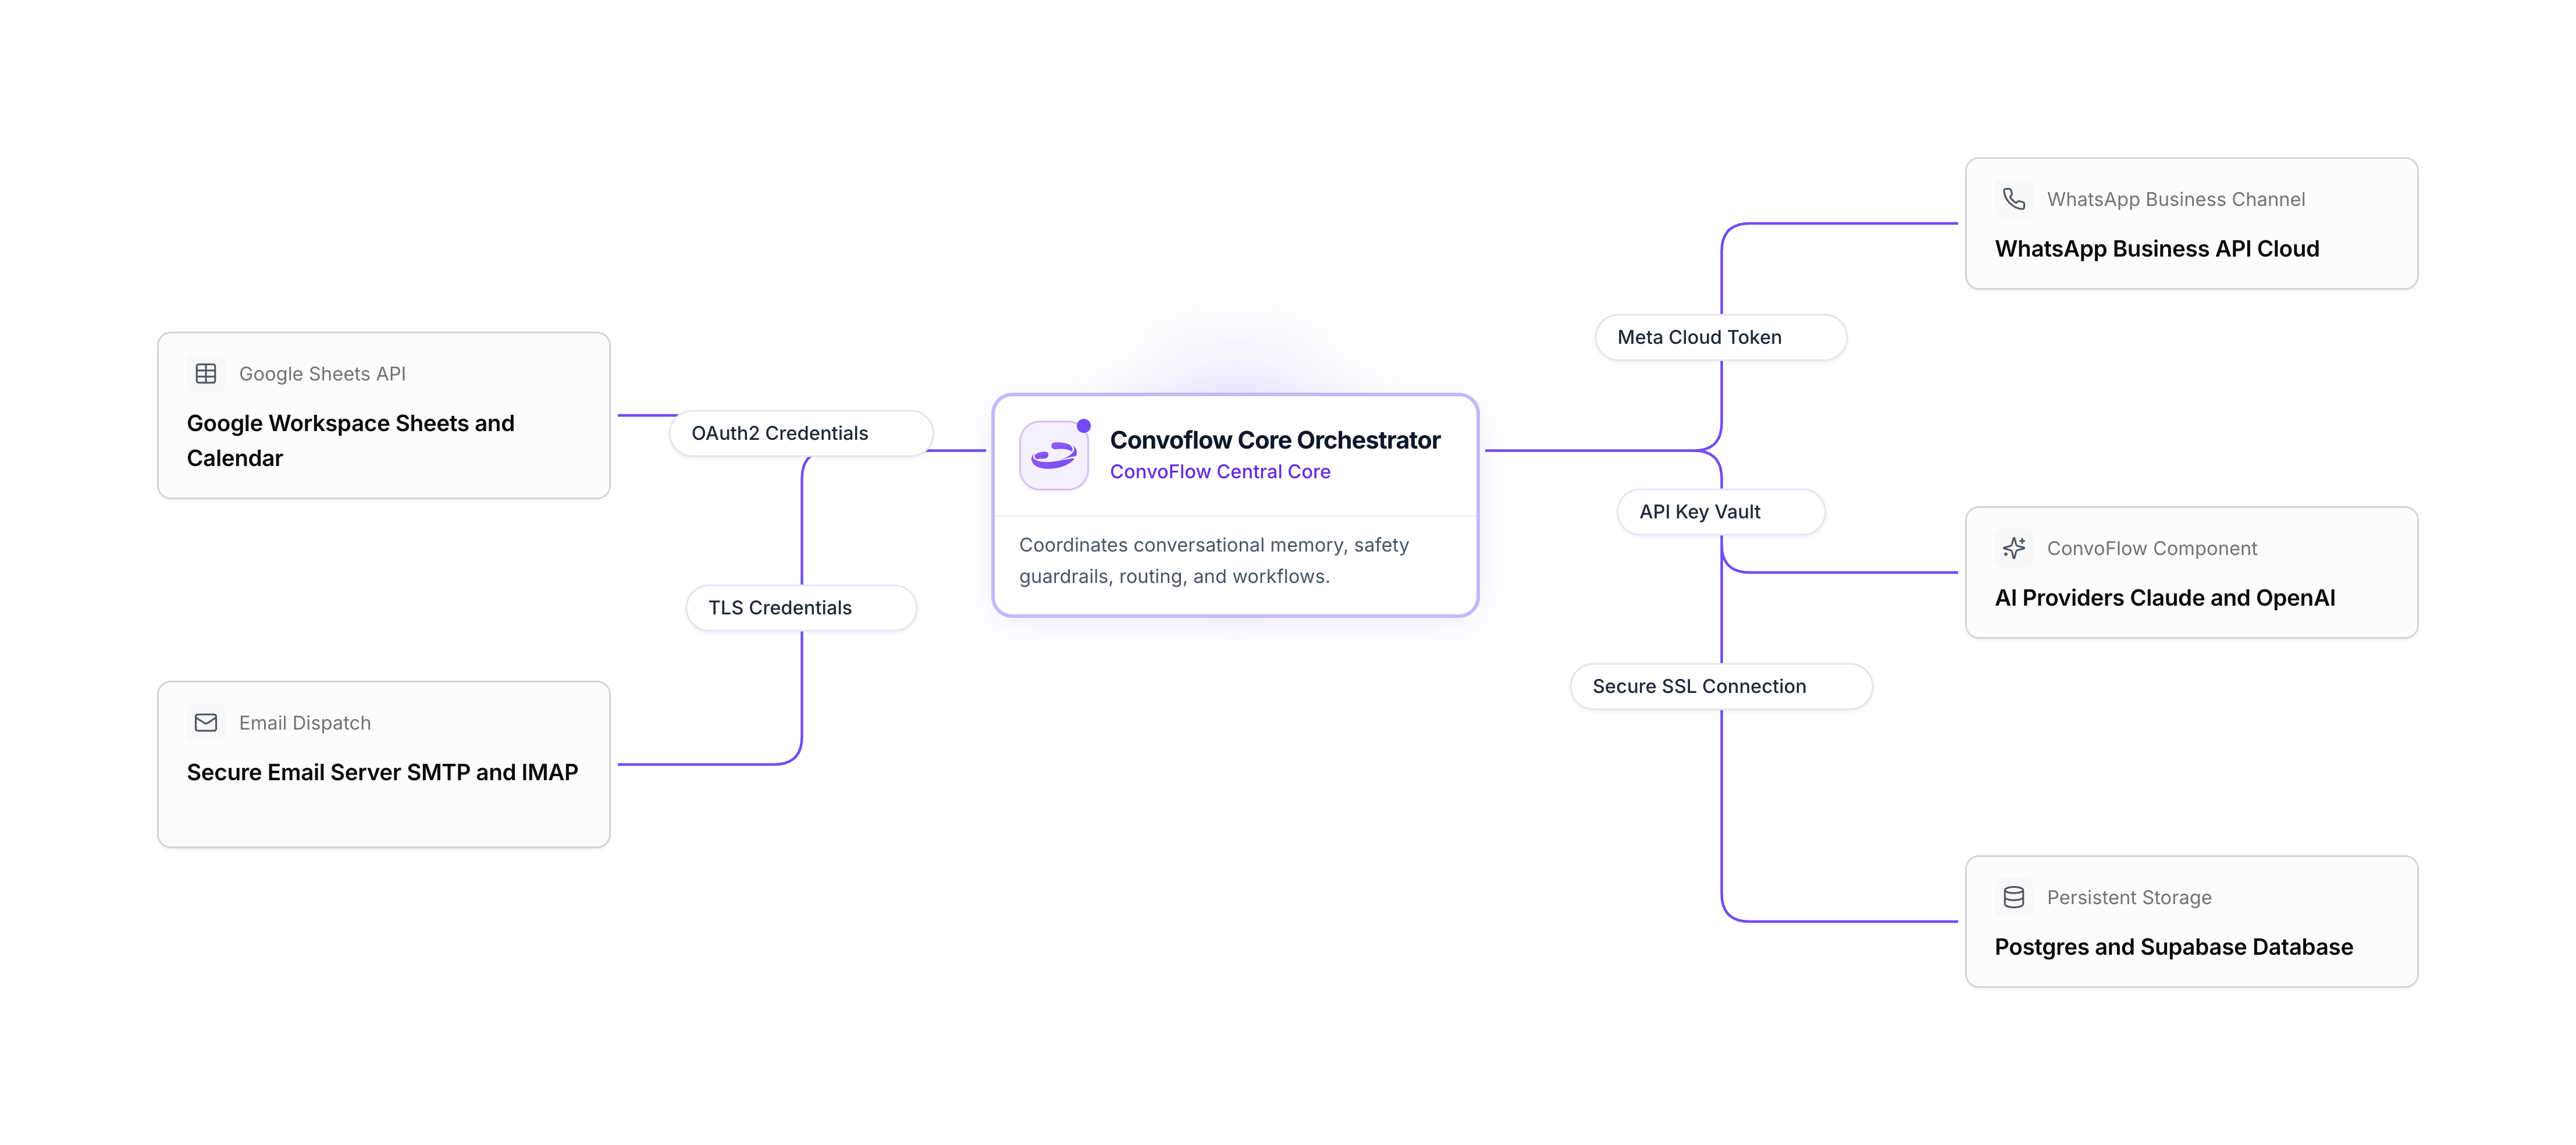
Mermaid
```text
graph LR
subgraph Convoflow
F[Customer Flows]
A[AI Assistants]
end
subgraph Secure Connections
C1[Google Workspace]
C2[Email SMTP Accounts]
C3[WhatsApp Business API]
C4[AI Providers]
C5[Databases]
end
F --> C1 & C2 & C3
A --> C4 & C5
```
---
## Why Use Centralized Connections?
1. **Enhanced Security:** All credentials and tokens are encrypted at rest. Your flows only reference the connection name rather than exposing keys.
2. **One-Time Setup:** Connect your Google or WhatsApp account once and reuse it across multiple workflows and projects.
3. **Instant Health Check:** Click **Test Connection** at any time to verify that your credentials are functional.
4. **Simple Key Rotation:** If you update an API key, you only need to change it in one central location.
---
## Available Connection Types
Unified connection for Google Sheets, Google Docs, and Google Calendar.
Send emails through Google Workspace, SendGrid, Resend, or your own SMTP server.
Connect official WhatsApp Business numbers via Meta for Developers.
Supported AI models available to power your agents in Convoflow.
Connect PostgreSQL databases, Supabase projects, or Airtable bases.
Set up authentication to connect with your own internal APIs and CRMs.
---
## Connection Statuses
| Status | Meaning |
| :--- | :--- |
| Active | The connection is working properly and ready for use. |
| Error | Credentials failed validation. Please check the entered key. |
| Inactive | Connection was temporarily disabled by an admin. |
---
## Webhooks & HTTP APIs
> URL: /en/connections/webhooks-http
> Specific llms.txt: /en/connections/webhooks-http/llms.txt
import { ParamField } from '@site/src/components';
# Connection: Webhooks & HTTP APIs
This connection lets you store access data in one place so you can connect to your own systems or web apps without exposing passwords in every flow.
---
## Configuration Fields
The authentication type required by your system:
- `none`: Public requests with no key.
- `bearer`: Authorization token (Bearer Token).
- `apiKey`: Access key sent in the headers.
- `basic`: Standard username and password.
Main address of your API (e.g. `https://api.yourcompany.com/v1`).
Fixed headers included in every request:
```json
{
"Content-Type": "application/json",
"X-App-ID": "convoflow"
}
```
---
## WhatsApp Cloud API
> URL: /en/connections/whatsapp
> Specific llms.txt: /en/connections/whatsapp/llms.txt
import { ParamField } from '@site/src/components';
# Connection: WhatsApp Cloud API
The **WhatsApp Cloud API** connection links your official WhatsApp numbers to Convoflow so you can reply to customer messages automatically with text, interactive buttons, and media files.
---
## Configuration Fields
WhatsApp Business Account ID (WABA ID) from your Meta Business Manager panel.
Phone number ID assigned in your Meta Developers app.
Permanent access token generated in the System Users section of Meta.
A secret word or code you choose to verify that messages arriving in Convoflow genuinely come from Meta.
---
## Webhook Setup in Meta
1. Go to [developers.facebook.com](https://developers.facebook.com/) and open your WhatsApp app.
2. In the side menu, go to **WhatsApp > Configuration**.
3. In the Webhooks section, paste the webhook URL provided by Convoflow:
```text
https://api.convoflow.ai/api/webhooks/whatsapp/{workspace_id}
```
4. Enter your **Webhook Verify Token** and click **Verify and Save**.
5. In the subscriptions list, enable the **messages** checkbox.
---